
You just got promoted. Congratulations — that’s genuinely worth celebrating.
Now comes the part nobody talks about: what do you actually do with your LinkedIn profile?
Most people handle this one of two ways. They either update their experience section quickly without thinking about how it looks to recruiters or professional contacts, click through the notification prompts without reading them, and move on. Or they overthink it entirely — worrying about whether sharing feels too self-promotional, whether the post will land awkwardly, whether updating their profile right away is the right move or whether they should wait.
Both approaches leave real opportunity on the table.
Your LinkedIn profile is the most visible professional document you have in 2026. More people will see your LinkedIn profile this year than will ever read your resume. When you get promoted, updating that profile correctly — and sharing it thoughtfully — creates genuine professional opportunities. Recruiters searching for your new title will find you. Potential clients or partners will encounter your profile with updated context about your role. Colleagues, mentors, and professional contacts will see you advancing in your career and reconnect.
Done well, a LinkedIn promotion update generates meaningful engagement, deepens professional relationships, and positions you for the next opportunity — whether that’s at your current company or somewhere else entirely.
Done poorly — duplicate entries, a boastful post, a notification that fires at the wrong moment — it creates an awkward impression that’s hard to shake.
This guide covers everything you need to know about how to add a promotion on LinkedIn correctly in 2026: the two methods for updating your experience section, what’s changed on the platform this year, best practices with real examples, post templates, and a complete FAQ for every edge case you might encounter.
Key Takeaways Before You Start
Before diving into the full guide, here’s a fast reference summary of the most important points:
- There are two methods for adding a promotion on LinkedIn — editing your existing experience entry or adding a new position — and choosing the wrong one creates messy profile duplication that confuses recruiters
- The notification toggle matters more than most people realize — timing when you notify your network is a strategic decision, not a checkbox to click through
- LinkedIn’s 2026 updates have made promotion celebration posts more visually prominent and more broadly distributed in the feed — which means the quality of your update matters more than it ever has
- A promotion post performs best when it includes specific achievements, genuine gratitude, and a forward-looking statement — not just a title announcement
- Your headline, summary, and featured section all need updating alongside the experience entry — most people only update one of the four
How to Add a Promotion on LinkedIn Step by Step
The most common mistake people make when updating for a promotion is treating both situations identically. Whether you stayed in the same role with a new title or genuinely moved into a different position within the same company matters — and the method you choose should reflect that distinction.
Here are both methods in full detail.
Method 1: Edit Your Existing Experience Entry (Best for Promotions Within the Same Team)
Use this method when your promotion represents a title change and expanded responsibilities within your existing role — same team, same reporting structure, same fundamental area of work. This keeps your career progression within one company block, which reads much more cleanly to anyone reviewing your profile.
When to use Method 1:
| Scenario | Use Method 1? |
|---|---|
| Same role, new title, same team | ✅ Yes |
| Title change + minor expanded responsibilities | ✅ Yes |
| Same team, same responsibilities, senior title only | ✅ Yes |
| Lateral move + title bump | ✅ Yes |
| Major department change with promotion | ❌ Use Method 2 |
| Promotion to management with entirely different scope | ❌ Use Method 2 |
Step-by-step instructions:
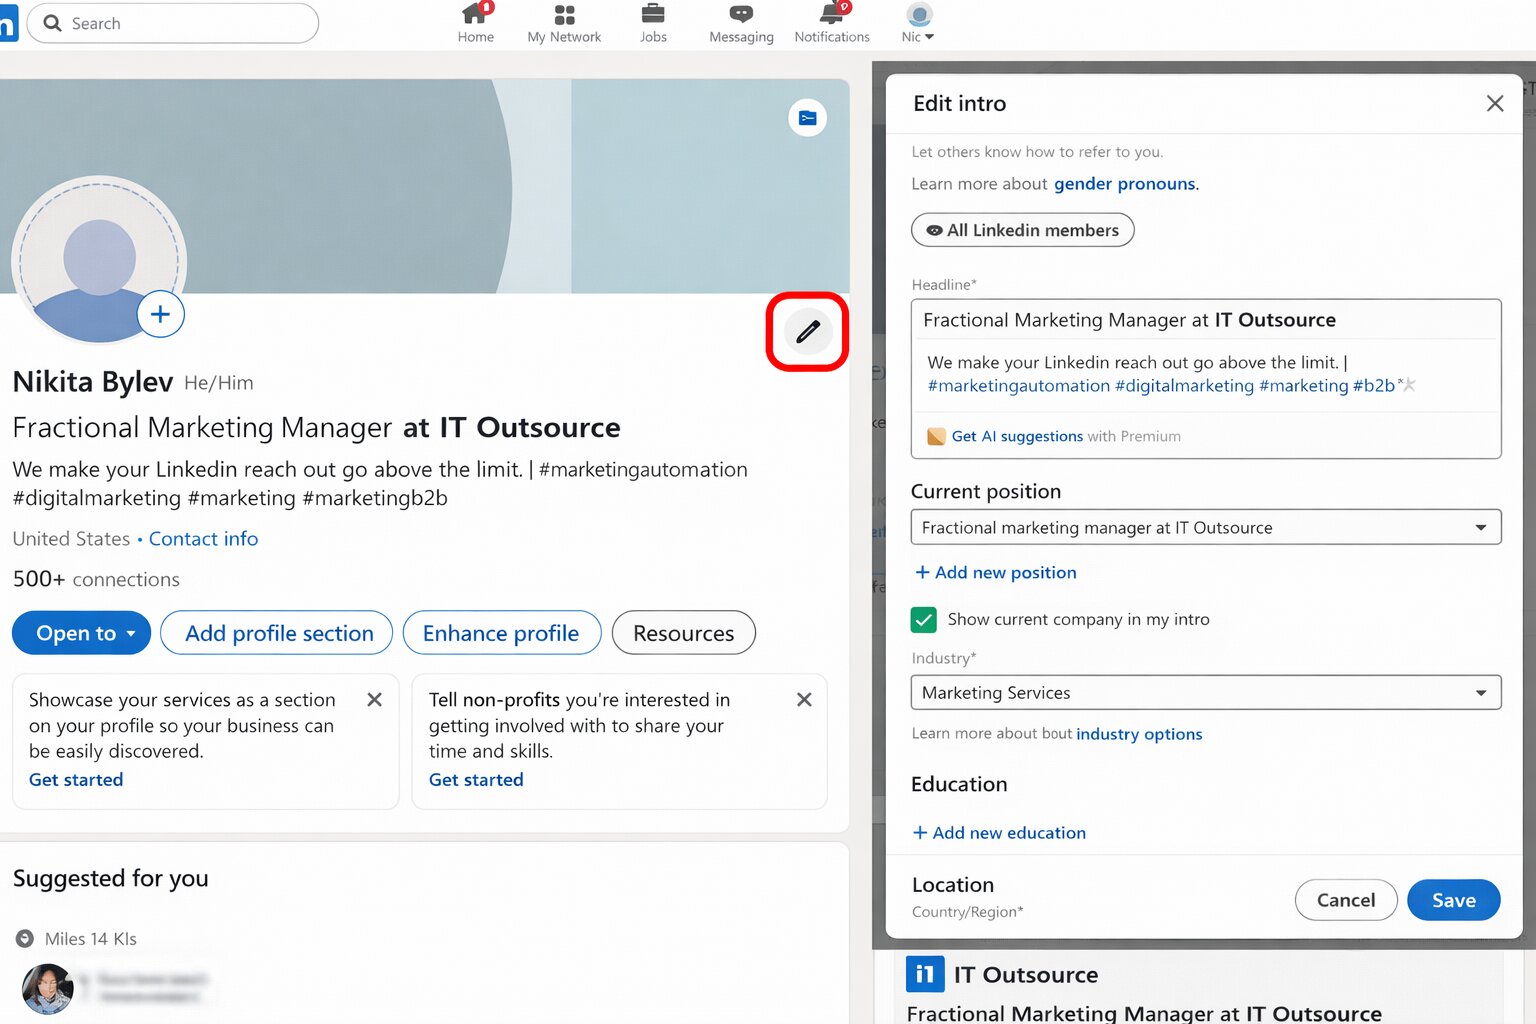
Step 1: Go to your LinkedIn profile Click the “Me” icon in the top navigation bar and select “View Profile” from the dropdown. This takes you to your full public profile page.
Step 2: Find the Experience section Scroll past your About section and Featured section until you reach Experience. Each of your positions appears here with the job title, company name, and date range visible.
Step 3: Click the edit icon on your current position On the right side of your current position, you’ll see a pencil icon. Click it to open the position editing panel. A modal window opens showing all the details of your current role.
Step 4: Update your job title Click into the Title field and change it to your promoted title. Keep the company name exactly as it was — do not create a new company entry.
Step 5: Add your previous role as a sub-entry within the same company Within the same experience block, look for the option to “Add position.” Click it and enter:
- Your previous title
- The date range it covered — from your original start date with the company to the date your promotion became effective
- A description of your key accomplishments in that previous role
This creates a nested, chronological progression that clearly shows career growth within one employer. Any recruiter or professional contact reading your profile immediately understands that you advanced — they don’t have to piece it together from two separate company entries.
Step 6: Write a fresh description for your promoted role In the main position entry — now reflecting your new title — write a description focused on:
- The expanded scope of your new role
- Specific results or achievements from your early time in the position (add these as they develop)
- The team size, budget, or business area you’re now responsible for
Step 7: Manage the notification toggle Before clicking Save, look for the “Share with network” or “Notify network” toggle near the bottom of the editing panel. This is the decision that determines whether LinkedIn sends a notification to your connections about your profile update. See Section 6 for a full breakdown of when to turn this on versus off.
Step 8: Save your changes Click Save. Your experience section updates immediately and the nested role progression appears on your profile.
Method 2: Add Your Promotion as a New Position (Best for Significant Role Changes)
Use this method when your promotion represents a fundamentally different role — different department, different reporting structure, significantly different responsibilities, or a genuine management transition where the nature of your work changed substantially.
When to use Method 2:
| Scenario | Use Method 2? |
|---|---|
| Same company, different department | ✅ Yes |
| Promotion to management (first time managing people) | ✅ Yes |
| Major expansion of scope — new business unit, new region | ✅ Yes |
| New reporting structure with different leadership team | ✅ Yes |
| Same role, slightly bigger title | ❌ Use Method 1 |
| Same responsibilities, just more senior | ❌ Use Method 1 |
Step-by-step instructions:
Step 1: Go to your Experience section Navigate to your profile and look for the “+” add icon on the top right of the Experience section — not the pencil icon on an existing entry, but the plus icon that adds a new entry entirely.
Step 2: Select “Add Position” Click the plus icon and select to add a new position. A new entry form opens.
Step 3: Enter your new role details Fill in each field:
- Title: Your promoted title
- Company: The same company name — LinkedIn will recognize it and link to the company’s page automatically
- Employment type: Full-time (same as previous unless this has changed)
- Start date: The date your promotion became officially effective
- End date: Leave blank — this is a current role
- Location: Update if your location or work arrangement changed with the promotion
Step 4: Write your description for the new role Focus on the expanded scope, new responsibilities, and what you’re building in this position. Specific achievements and metrics strengthen this description significantly — even if you add them over the first few months rather than all on day one.
Step 5: Close out your previous role cleanly Go back and edit your previous position. Set its end date to match the date your promotion became effective. This closes the previous entry cleanly and prevents any timeline overlap that would confuse profile readers.
Step 6: Write an updated description for the closed role Now that the previous role is a completed chapter, update its description to reflect your full tenure and most significant accomplishments during that period. This is a good opportunity to reframe it with the perspective of what you built over that entire time.
Step 7: Manage the notification toggle and save Same consideration as Method 1 — decide consciously whether you want LinkedIn to notify your network of this update before saving.
What’s Changed in 2026: LinkedIn’s New Promotion Features
Understanding what LinkedIn has updated around career milestones in 2026 helps you take advantage of features that didn’t exist — or worked differently — even twelve months ago.
Richer Work Celebration Visuals
LinkedIn has upgraded the visual treatment for career milestone updates throughout 2026. When a promotion update goes live, it now triggers a richer card format in the feed — a larger visual display that prominently shows your new title, company, and a celebratory design element that wasn’t part of the previous format.
What this means practically: the visual quality of your promotion update now carries more weight than it did before. The card pulls your headline and company profile information directly into its display — which is why updating your headline to reflect your new title before you make your promotion public is more important than ever. If your headline still shows your old title when the celebration card appears in your network’s feed, that’s the title they’ll see in the most prominent element of the update.
Stronger Feed Distribution for Promotion-Triggered Updates
LinkedIn’s algorithm has increased the distribution priority for work celebration updates in 2026. Career milestone posts — promotions, work anniversaries, new roles — now receive broader initial reach than most content types. Your promotion update will reach a larger percentage of your first-degree network than a standard text post typically does.
The algorithm amplifies this further based on early engagement. Posts that generate reactions, comments, and shares within the first 60–90 minutes receive significantly expanded distribution beyond your immediate network. This has two practical implications:
First, the quality of your promotion announcement post now has a larger impact on how many people see it — because the algorithm is actively looking for early engagement signals to decide whether to push it further.
Second, seeding early engagement matters. Telling a close colleague, mentor, or manager that you’re about to post your promotion announcement — and asking them to engage with it in the first hour — is not gaming the system. It’s using the platform the way it’s designed to work.
Clearer Prompts to Share Promotions Publicly
After you save an experience update, LinkedIn now surfaces a more deliberate prompt asking whether you want to share the change publicly. New in 2026: before you confirm sharing, LinkedIn shows you a preview of exactly how your update will appear in your network’s feed — including the celebration card format, your headline, and any suggested caption language LinkedIn generates automatically.
This preview is genuinely useful — but it’s also a moment where many users make a mistake. The suggested caption LinkedIn generates tends to be generic and flat. The preview is an opportunity to either replace that language entirely with your own carefully written announcement, or to edit it into something that sounds authentically like you. Auto-sharing LinkedIn’s generated text is the easiest path and almost never the best one.
A Guide to Adding a Promotion on LinkedIn the Right Way
The experience section update is the obvious task — but it’s only part of what needs attention when you get promoted. Here’s the full list of profile sections that should be refreshed alongside your experience entry:
| Profile Section | What to Update | Priority |
|---|---|---|
| Headline | Update to new title — this is your highest-visibility element | ✅ High |
| Experience section | New role using Method 1 or Method 2 | ✅ High |
| About/Summary | Reflect new scope, leadership level, or focus area | ✅ Medium-High |
| Featured section | Add promotion post, project from new role, or relevant media | ✅ Medium |
| Skills section | Add skills relevant to your new responsibilities | ✅ Medium |
| Profile photo/banner | Update if company branding or professional presentation changed | ⬜ Optional |
Promotion vs. new role: the key distinction for profile treatment
When a promotion at the same company is added incorrectly as a completely new position with a separate company entry, profiles start looking like the person left and rejoined the same employer — or duplicated their employment history accidentally. Recruiters who review hundreds of profiles notice this immediately, and it raises questions that shouldn’t exist.
The clearest signal for which treatment is correct: if someone asked you “did you leave the company and come back?” and the honest answer is no, use Method 1. If the new role is genuinely a different job that happens to be at the same employer, Method 2 is appropriate.
Top 5 Best Practices for Announcing Your Promotion on LinkedIn
Getting the technical update right is the foundation. Getting the announcement right is the opportunity. Here’s what consistently separates LinkedIn promotion updates that generate real engagement and professional impact from ones that get scrolled past.
1. Lead With Specific Achievements and Results
A title change without context is just words on a page. The achievement that earned the promotion is the actual story — and that’s what makes your update genuinely interesting to your network.
Before writing your experience description or announcement post, ask yourself one question: “What did I do that made this promotion happen?” The answer to that question is your content.
| Generic Description | Achievement-Driven Description |
|---|---|
| “Promoted to Senior Manager” | “Promoted to Senior Manager after leading a team that grew revenue 43% YoY and reduced customer churn by 18% in the same period” |
| “Now leading the marketing team” | “Leading a 12-person marketing team — built it from 4 people over 18 months before being promoted to run it” |
| “Expanded responsibilities in product” | “Promoted to Lead Product Manager after shipping 3 features that collectively drove 2.1M new signups in Q3 2025” |
The difference between the generic and specific versions isn’t just a matter of writing quality — it’s a matter of what story they tell. The specific version makes the promotion feel earned and credible. The generic version makes it feel like just another title.
At least one specific metric in your experience description or announcement post transforms the update from a self-report into a demonstration of performance. Even if you can only share a percentage, a team size, or a timeframe — one concrete data point is always better than none.
2. Surface the Soft Skills That Drove the Promotion
Quantitative achievements prove results. The soft skills behind those results reveal how you operate and what you’ll bring to the new role and the next one.
Your promotion itself is evidence that your organization values specific qualities in you — and your LinkedIn update is an opportunity to name those qualities without it feeling like you’re listing adjectives from a job description.
The key to writing about soft skills without resorting to buzzwords is anchoring them to specific situations:
| Buzzword Version (Avoid) | Context-Anchored Version (Use) |
|---|---|
| “Strong communicator” | “Led weekly cross-functional standups that kept 4 departments aligned through a major platform migration” |
| “Collaborative leader” | “Built partnerships with the sales and product teams that led to our first fully integrated go-to-market launch” |
| “Strategic thinker” | “Identified a pricing model gap that was causing 22% of trials to drop off — restructured the approach and reduced that number to 9% in one quarter” |
The second column shows the soft skill without naming it — and it’s dramatically more compelling as a result. Let the specific situation demonstrate the quality rather than asserting it directly.
3. Remove Daily Responsibilities From Your Promotion Description
This is the most pervasive mistake in LinkedIn experience sections — and it becomes even more damaging in a promotion update, where the goal is to demonstrate growth and impact.
Daily responsibilities describe what you were hired to do. They’re in your job description. They don’t differentiate you from every other person who held the same title before you. They tell readers what the role is, not what you contributed to it.
Before writing any sentence in your promotion description, run it through this test: “Does this describe a responsibility or a result?”
| Responsibility (Remove It) | Result (Keep It) |
|---|---|
| “Managed a team of software engineers” | “Grew engineering team from 4 to 14 while maintaining 96% sprint completion rate across 8 consecutive quarters” |
| “Responsible for client relationships” | “Retained 97% of enterprise clients through a major pricing restructure that reduced our per-seat cost by 23%” |
| “Oversaw the product roadmap” | “Shipped 4 major product releases that collectively drove $2.3M in new ARR and 31% improvement in user activation” |
| “Led marketing campaigns” | “Delivered 3 product launch campaigns that generated 18K new trial signups at 40% lower CAC than the previous year” |
Every sentence that survives this edit is a sentence that demonstrates your specific value. Every sentence that doesn’t is a sentence that belongs in a job posting, not a career achievement update.
4. Add Rich Media to Make Your Profile Entry More Compelling
LinkedIn allows you to attach media directly to experience entries — documents, images, links, presentations, and videos. Media-enriched experience sections generate more profile views and more engagement when your profile appears in search results. Most people never add any media at all, which means the ones who do stand out immediately.
What to consider adding to your promoted role’s experience entry:
- A link to a major project, campaign, or initiative from your work
- A presentation or report that demonstrates the scope or impact of your work
- A media feature, press mention, or industry recognition from your tenure
- A case study or results summary from a significant project
You don’t need to add media on the first day of your new role. Waiting until you have something genuinely strong to add — within the first month or two — produces better results than adding placeholder content under pressure. The goal is something that enhances the credibility of the entry, not something that just fills the media field.
5. Be Strategic About When You Notify Your Network
The notification toggle isn’t a formality — it’s one of the most strategically important decisions in the entire promotion update process.
Turn network notifications ON when:
You have a well-crafted announcement post ready to accompany the profile update. Your promotion represents a genuine career milestone worth marking publicly. You’re open to new conversations and opportunities that your new title might attract. Your network is active and engaged enough that the notification will generate real interaction. The timing is right — Tuesday through Thursday generates significantly higher engagement for career update posts than Monday mornings or Fridays.
Turn network notifications OFF when:
You’re currently job searching and don’t want your employer to be reminded of your LinkedIn activity. The promotion is a minor title adjustment that doesn’t reflect a meaningful role change. You want to update your profile quietly first and craft a deliberate, well-timed announcement post separately — rather than having LinkedIn generate a generic notification on your behalf. You’re planning to leave the company in the near future and don’t want to generate conversations around a role you won’t hold for long.
| Situation | Notification Recommendation |
|---|---|
| Major career milestone promotion | ✅ Turn on — this is worth celebrating publicly |
| Minor title adjustment | ⬜ Optional — consider if it merits the attention |
| Currently job searching | ❌ Turn off — update quietly |
| Planning to leave soon | ❌ Turn off — don’t generate conversation around a temporary role |
| Have a great announcement post ready | ✅ Turn on — pair the notification with strong content |
| Not ready to write a post yet | ❌ Turn off — update now, post when you’re ready |
What Should a LinkedIn Promotion Post Actually Say?
The profile update is the technical change. The promotion post is the narrative opportunity — and it’s where most people either succeed in creating genuine engagement or fall flat with something that reads as either too humble or too boastful.
Here’s what a strong LinkedIn promotion post contains and why each element matters:
| Post Element | Purpose | What It Looks Like |
|---|---|---|
| The announcement | Clearly state what the promotion is | “I’m thrilled to share that I’ve been promoted to [Title] at [Company]” |
| The achievement | Show what earned it — specific, not vague | “After leading [specific project/outcome], our team [specific result]” |
| The gratitude | Acknowledge the people who contributed | “This wouldn’t have happened without [mentor/team/manager]” |
| The lesson | Share something genuine you learned | “The most important thing I learned in the last [X] years was…” |
| The forward look | Signal your focus and energy in the new role | “In this next chapter, I’m focused on [specific priority]” |
| The call to connect | Invite relevant engagement | “If you’re working on [relevant area], I’d love to connect” |
Tone guidelines that consistently outperform generic announcements:
Authentic outperforms polished every time. LinkedIn’s algorithm rewards posts that generate comments, and comments come from posts that feel genuinely human — not corporate announcements.
Specific outperforms general. “After three years of building our enterprise sales motion from scratch” is more compelling than “After years of hard work.”
Grateful outperforms boastful. Posts that lead with what you’re proud of perform significantly worse than posts that lead with who helped you get there. Gratitude invites others to be part of your story.
Forward-looking outperforms backward-looking. Celebrating the achievement is important — but your network wants to know what you’re going to do next. A brief statement about your focus in the new role transforms a backward-looking milestone into a forward-looking signal.
Optimal length: 150–300 words. Shorter feels like an afterthought. Longer loses readers before the call to connect.
Best timing: Tuesday through Thursday, 8–10am in your primary audience’s timezone. Avoid Monday mornings when inboxes are at their most crowded, and Friday afternoons when professional attention has already drifted.
Example Promotion Post Templates You Can Adapt Today
These three templates cover the most common approaches to LinkedIn promotion announcements. Each is built around a different narrative anchor — achievements, lessons, or team recognition. Customize every bracketed field with specific, genuine details from your own experience.
Template 1: The Achievement-Led Announcement
“After [X] years at [Company], I’m excited to share that I’ve been promoted to [New Title].
When I joined as [Previous Title], I set a goal to [specific goal you had]. What I didn’t anticipate was [genuine challenge, turning point, or unexpected lesson that shaped your journey].
In the past [timeframe], our team [specific achievement with a real metric]. That work — and the people who made it possible — is what this promotion reflects.
Thank you to [specific person] for the mentorship and trust, and to my team for everything you contributed.
In this next role, I’ll be focused on [specific priority or goal]. If you’re working on [relevant area or challenge], I’d genuinely love to connect and compare notes.”
Template 2: The Lesson-Led Announcement
“I’ve been promoted to [New Title] at [Company] — and I want to share the one thing that made the biggest difference.
[One genuine, specific insight or lesson from your career journey — not generic career advice, but something true to your specific path.]
Three years ago, I was [previous situation or challenge]. Today, I’m [what you’re leading or building]. The distance between those two points wasn’t just hard work — it was [what actually moved the needle: a specific mentor, a pivotal project, a difficult decision you made, a skill you deliberately developed].
Grateful beyond words to [specific people who contributed] for investing in me.
Excited for what comes next. If you’re building in [relevant space or industry], let’s connect.”
Template 3: The Team-Led Announcement
“Proud to share that I’ve been promoted to [New Title] at [Company].
But I want to be honest about something: I didn’t do this alone.
[Team member name], [team member name], and [team member name] — you made this possible. The work we did together on [specific project or initiative] is the foundation this promotion stands on.
[Manager’s name] — thank you for seeing what I could become before I fully believed it myself.
To anyone earlier in their [industry or career path]: [one-line piece of genuine, specific advice based on your actual experience — not generic motivation].
On to the next chapter.”
Customization reminder: The difference between a post that generates 200 comments and one that generates 5 is almost always specificity. Replace every bracketed field with something real. The more specific your details, the more authentic your voice comes through — and the more your network has something genuine to respond to.
Conclusion
You now have everything you need to update your profile correctly and announce your promotion in a way that creates genuine professional impact.
Here’s a practical 48-hour action plan:
| Action | Priority | When to Do It |
|---|---|---|
| Update your headline to reflect your new title | ✅ High | Immediately |
| Add the promotion using the correct method | ✅ High | Today |
| Update your About/Summary section | ✅ Medium-High | Within 48 hours |
| Write and schedule your announcement post | ✅ Medium-High | Within the first week |
| Update your Featured section | ✅ Medium | Within the first two weeks |
| Add relevant skills to your Skills section | ⬜ Low | When convenient |
| Update your resume and any other external profiles | ⬜ Low | When convenient |
The promotion is the milestone. What you do with the LinkedIn visibility it creates is the real opportunity.
Your network will see the update. Recruiters searching for your new title will find your profile in search results. Potential clients, partners, or collaborators will encounter your name with updated context about your role and what you’ve accomplished. Make sure what they find — the headline, the experience description, the announcement post — reflects not just your new title but the genuine value and capability you bring to it.
A thoughtful, well-executed LinkedIn promotion update takes less than an hour to do correctly. The professional opportunities it can generate last years.
Frequently Asked Questions
Can I add a promotion on LinkedIn without notifying my network?
Yes — and this is one of the most important things to know before you start. Before saving your experience update, look for the “Share with network” or “Notify network” toggle and switch it off. Your profile updates silently. You can then write a deliberate announcement post and share it when you’re ready — giving you full control over the timing and quality of how your promotion is shared.
Will LinkedIn notify my network automatically if I don’t turn off the toggle?
Yes — LinkedIn’s default setting has the notification toggle turned on when you save experience section changes. If you don’t actively turn it off before saving, LinkedIn will generate and distribute a notification to your connections. This is why it’s worth pausing at that toggle rather than clicking through automatically.
How do I show a promotion within the same company without creating two separate company entries?
Use Method 1 — edit your existing position and add a sub-role within the same company block. This creates a nested progression that shows clearly you advanced within one employer. Two separate company entries for the same employer look like an error or duplication on your profile and can confuse recruiters who review your background quickly.
Should I mention my salary increase in my LinkedIn promotion post?
No. Compensation details are almost universally inappropriate to share in a public LinkedIn post. The promotion itself — the title, the expanded responsibility, the recognition — is the achievement worth sharing. Salary is personal and sharing it publicly creates more awkwardness than connection.
How long should I wait before posting about my promotion?
Wait until the promotion is officially confirmed and your start date in the new role has actually begun. Announcing before your official start date can create complications if anything changes administratively. Most professionals post within the first two weeks of starting the new role. If your company has communication guidelines around external announcements, follow those first.
What if I was promoted but my company was also renamed or acquired at the same time?
Update the company name in your experience entry to reflect the current name. Add a note in your description: “[Current Company Name] was formerly known as [Previous Company Name].” This maintains continuity of your employment record while accurately reflecting the current identity of the organization. LinkedIn’s company page linking may need to be updated manually if the company page itself changed.
Can I add a promotion on LinkedIn from the mobile app?
Yes — the LinkedIn mobile app supports the full experience editing workflow. Navigate to your profile, scroll to Experience, tap the edit icon on your current position, and follow the same steps as the desktop process. The interface looks slightly different on mobile but the functionality is identical.
Should I update my promotion if I’m planning to leave the company soon?
Generally yes — a promotion is a legitimate career achievement worth recording accurately on your profile regardless of future plans. Consider turning off network notifications if you’re actively job searching. Once you leave, update the role’s end date and description to reflect your complete tenure and key achievements from that period.
What if I want to update my profile now but write a post later?
This is actually the recommended approach for many situations. Turn off the notification toggle, save your experience update quietly, take the time to write a genuinely good announcement post, and then publish it when the timing and content are right. You maintain full control over the narrative this way rather than having LinkedIn generate a generic notification on your behalf.