

A recruiter messages you on LinkedIn. You reply, say you are interested, and the conversation is going well — until you mention a 60-day notice period. The recruiter needed someone in 30 days. The conversation stops. The opportunity is gone.
This is not a rare scenario. It happens every day, and it is almost entirely avoidable. LinkedIn added a dedicated notice period field to the Open to Work panel in October 2025 specifically because this friction was wasting time on both sides of the hiring conversation, particularly in markets like India where notice periods of 60 to 90 days are the contractual norm, not the exception.
This guide covers the exact steps to update your notice period and employment status on LinkedIn, explains what recruiters actually see on their end when these fields are filled out, and tells you which settings matter and which ones to skip. Whether you are currently serving notice, actively looking while still employed, or have already left your last job, the steps here apply directly to your situation.
What “Updating Your LinkedIn Status” Actually Means (And Why Most People Do It Wrong)
When most people say they want to “update their LinkedIn status,” they mean one thing. In practice, there are three completely separate actions that get grouped under this phrase, and confusing them with each other is how professionals end up with inaccurate profiles, missed recruiter searches, and conversations that start on the wrong foot.
Understanding the difference between these three actions is the foundation of everything else in this guide.
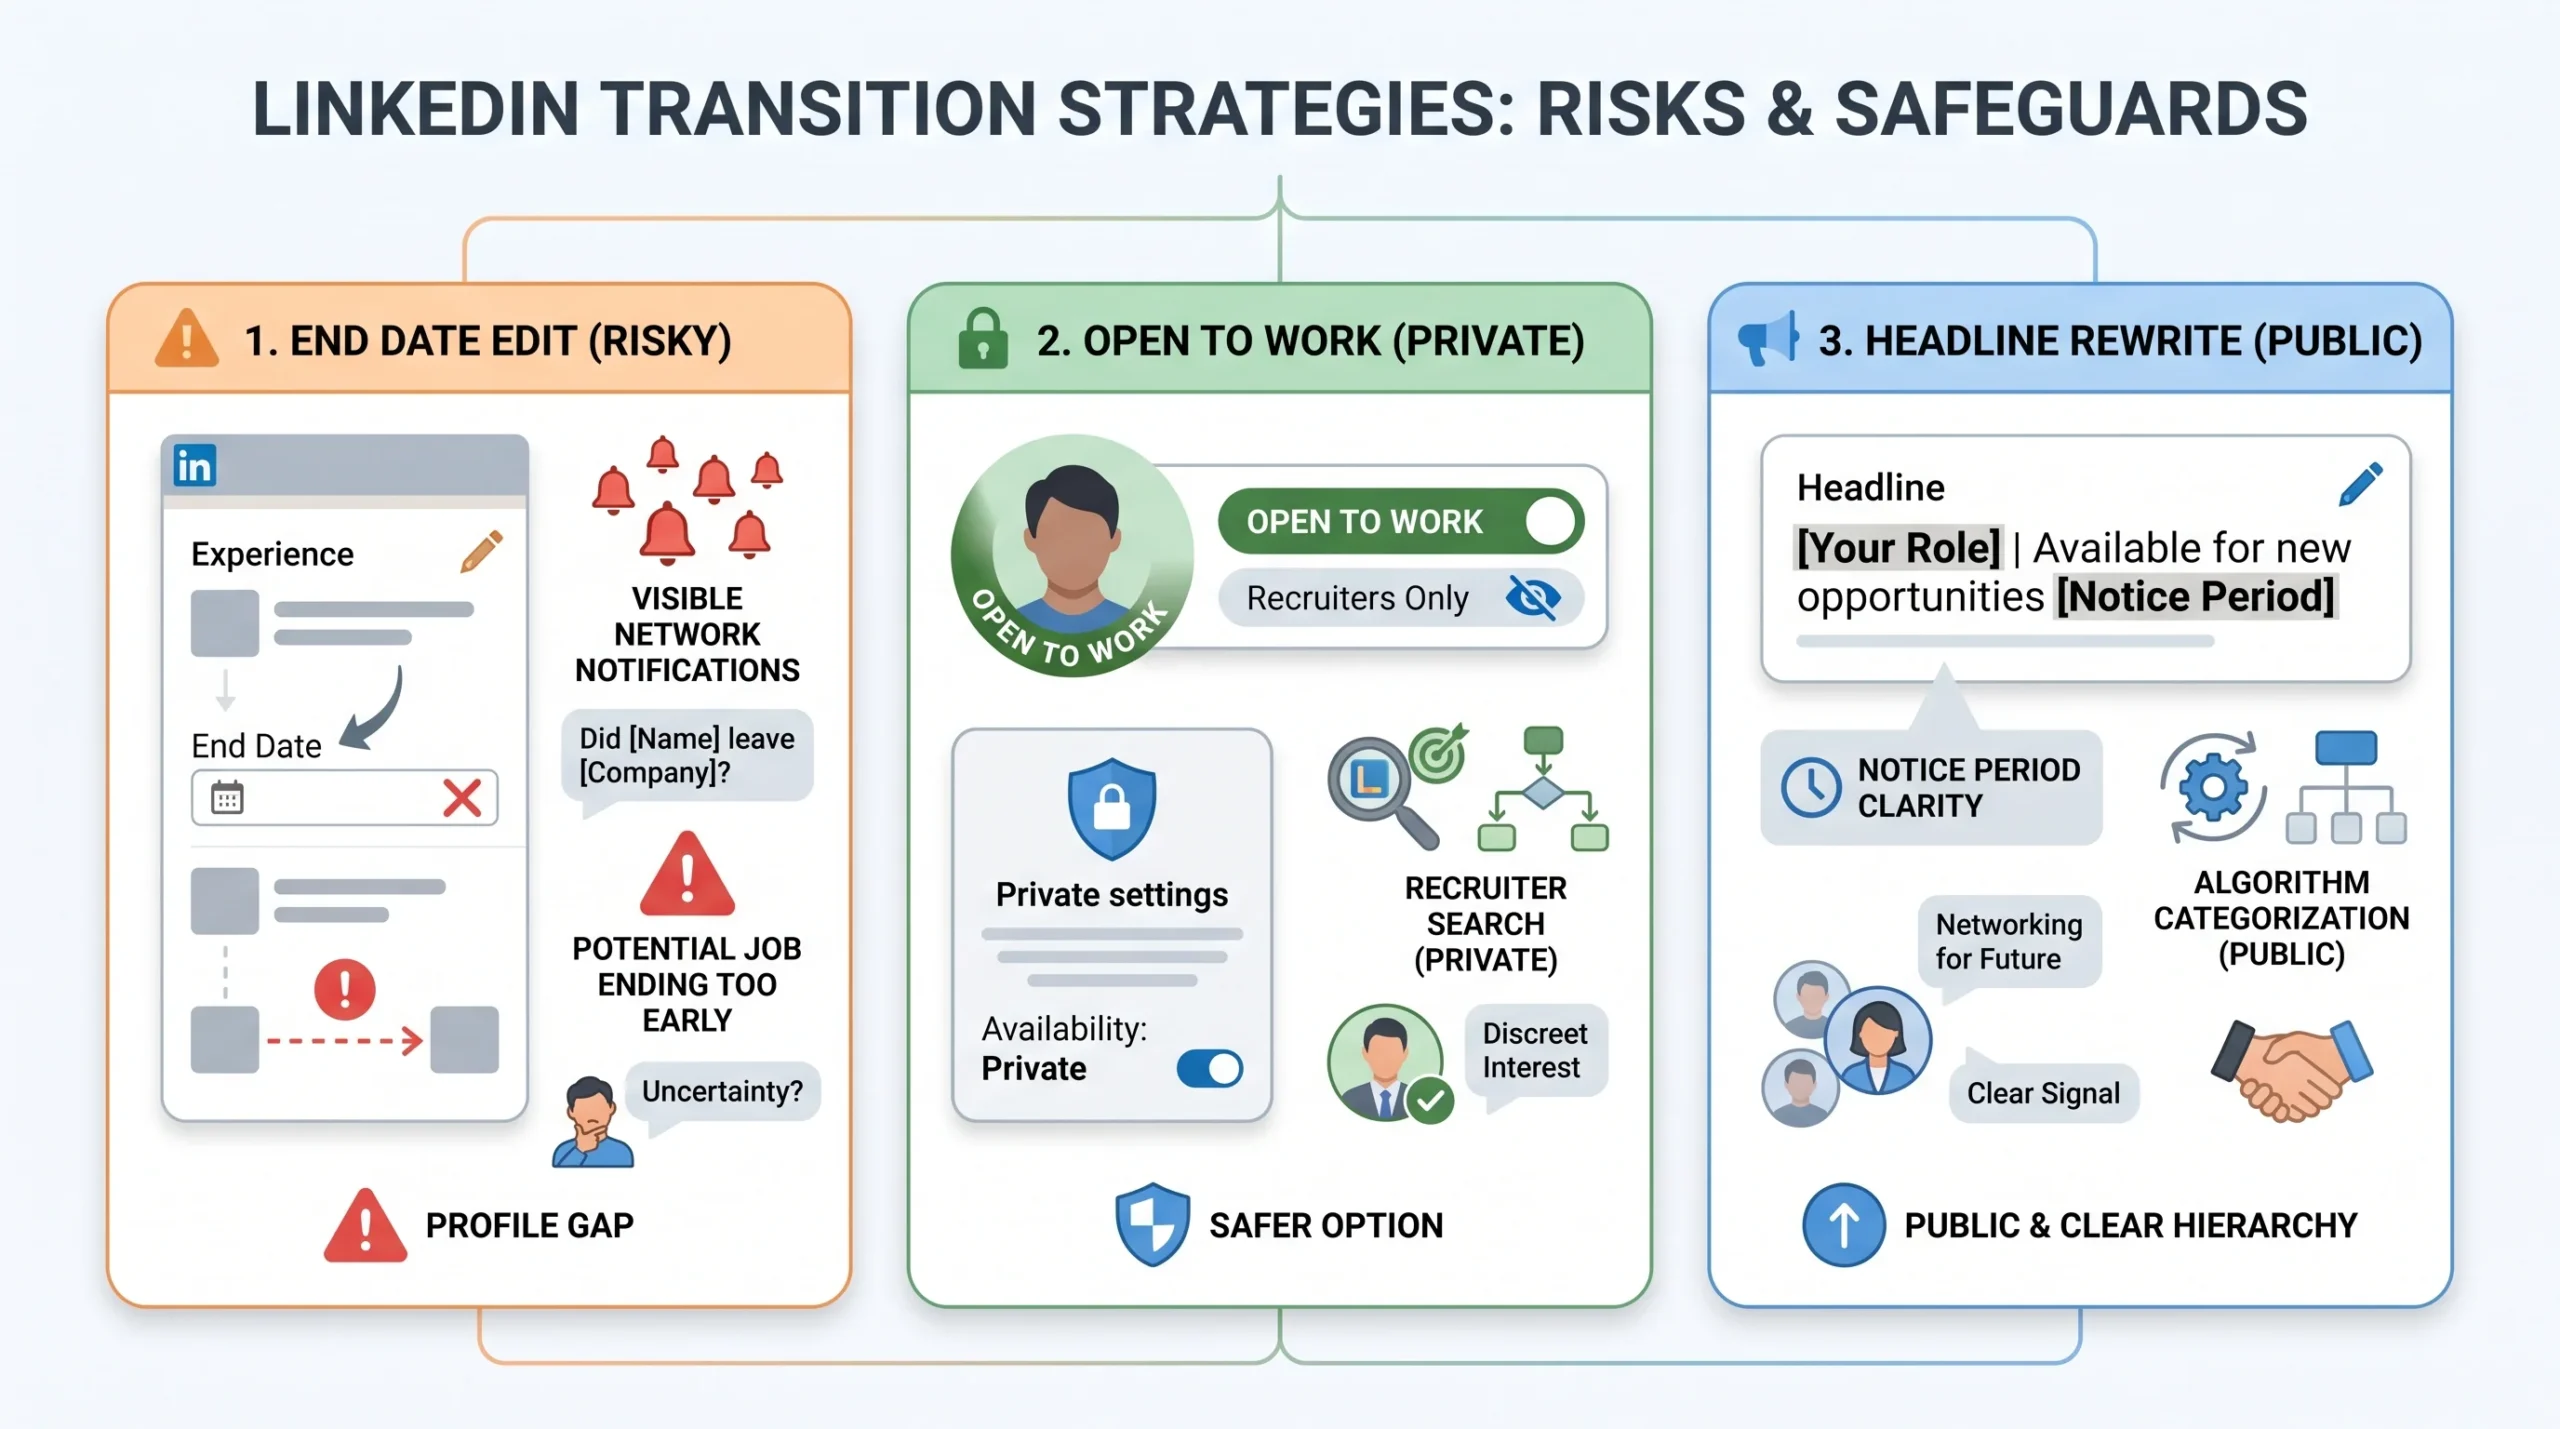
The three distinct actions are:
- Editing the end date on your current job in the Experience section. This tells LinkedIn (and your entire network) that you have left the role. It changes how your profile is categorized by the algorithm and signals to anyone who views it that you are no longer at that company. This action is only appropriate once your last day has passed.
- Turning on Open to Work and filling in the notice period field. This is the right action to take while you are still employed and serving notice. It is visible only to recruiters if you choose the “Recruiters Only” setting, does not alter your employment record in any way, and communicates your availability timeline without making a public announcement to your entire network.
- Rewriting your LinkedIn headline to include notice period language. This is something many professionals do instinctively — adding phrases like “Serving notice | Available from March 2026” to their headline. The intention is good but the execution has real downsides related to how LinkedIn’s search algorithm works, which is covered in detail in Section 4.
These three actions are not interchangeable. Each serves a different purpose, communicates a different signal, and has different consequences for your visibility in recruiter searches. Using the wrong one at the wrong time either hides you from recruiters who are looking for candidates exactly like you, or exposes your job search to people (including your current employer) before you are ready.
The Mistake of Marking Your Job as “Ended” Too Early
Closing out your current role in the Experience section while you are still employed is one of the most common and consequential mistakes professionals make during a job transition.
Here is what actually happens when you add an end date to your current role before your last day:
- LinkedIn’s algorithm categorizes your profile differently. The platform treats an open end date as a signal of current employment. Once you add an end date, your profile moves from the “currently employed” category to the “not currently employed” category in recruiter search filters. These are two distinct pools. Recruiters searching specifically for passive candidates who are still in a role will no longer find you.
- Your entire network sees the update. Unless you manually disable the “Notify your network” toggle in privacy settings before making the change, LinkedIn sends a notification to your connections when you update your experience. Announcing a departure before your official last day can damage your relationship with your current employer and create awkwardness you do not need during a transition.
- Date gaps become visible. If your end date and start date at your next company do not line up cleanly, the gap is visible on your profile to every recruiter who looks at your timeline. Adding an end date too early makes that gap longer than it needs to be.
The correct approach: keep your current role listed as active with no end date until your actual last working day has passed. The Open to Work feature exists precisely so you can signal availability to recruiters before that date without touching your employment record.
How to Add Your Notice Period on LinkedIn Using the Open to Work Feature (Step-by-Step)
LinkedIn updated its Open to Work feature in October 2025 to include a dedicated notice period field alongside options for job titles, locations, employment type, and expected salary. Before this update, the notice period field existed only in certain regions, primarily India. It is now available more broadly. According to LinkedIn’s own data, turning on Open to Work roughly doubles your chances of receiving a message from a recruiter.
Here are the exact steps to set it up correctly on both desktop and mobile.
Steps on Desktop:
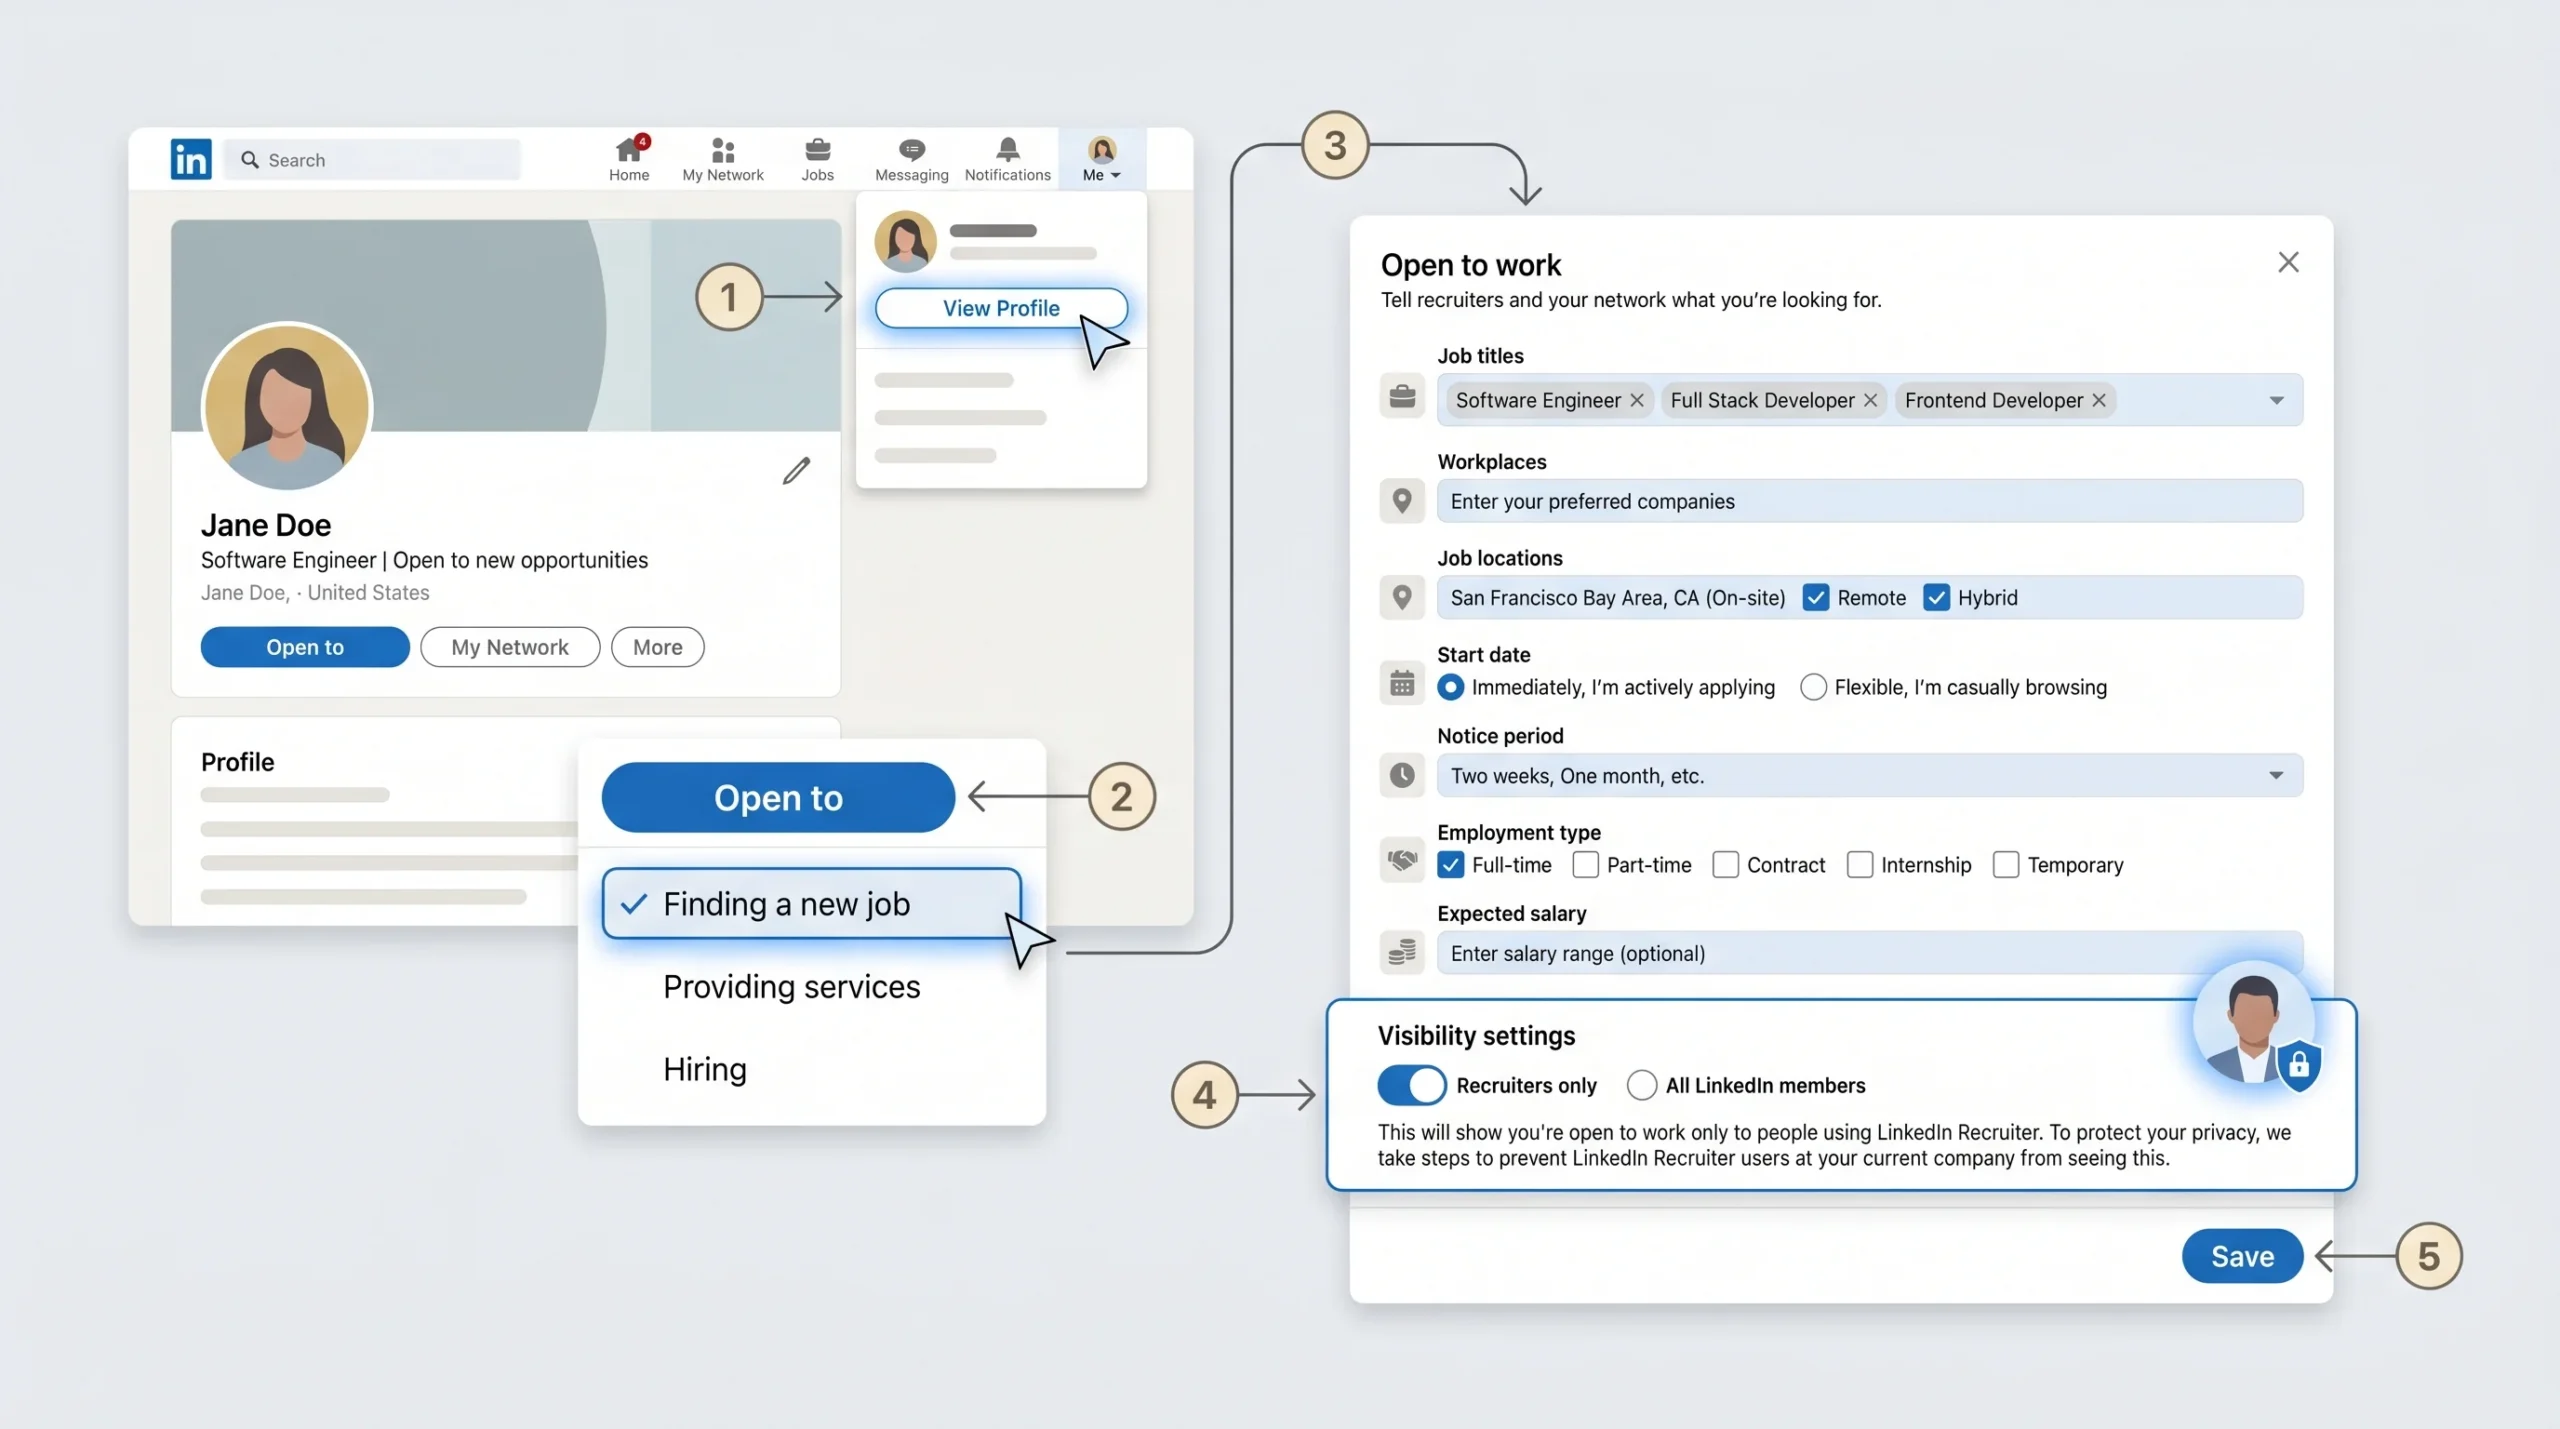
- Go to your LinkedIn profile by clicking your profile photo or the “Me” icon at the top of the LinkedIn homepage.
- Click “View Profile” to open your full profile page.
- Look for the “Open to” button near your profile photo and headline area. If you have not enabled Open to Work before, it will appear as a dropdown. Click it and select “Finding a new job.”
- A panel will open with several fields to fill in: job titles you are looking for, preferred locations, start date, and employment type (full-time, part-time, contract, etc.).
- Fill in the “Start date” field to reflect when you are realistically available to begin a new role. If you are serving a 60-day notice period, set this accordingly — do not set it to “Immediately” if that is not accurate.
- Fill in the “Notice period” field. LinkedIn typically offers options such as Immediately, Two weeks, One month, Two months, Three months, or a custom entry.
- Fill in your expected salary if you want recruiters to have that information upfront. Like the notice period field, this is visible only to recruiters regardless of your overall Open to Work visibility setting.
- Select your visibility preference (covered in detail below).
- Click “Save.”
Steps on Mobile (iOS and Android):
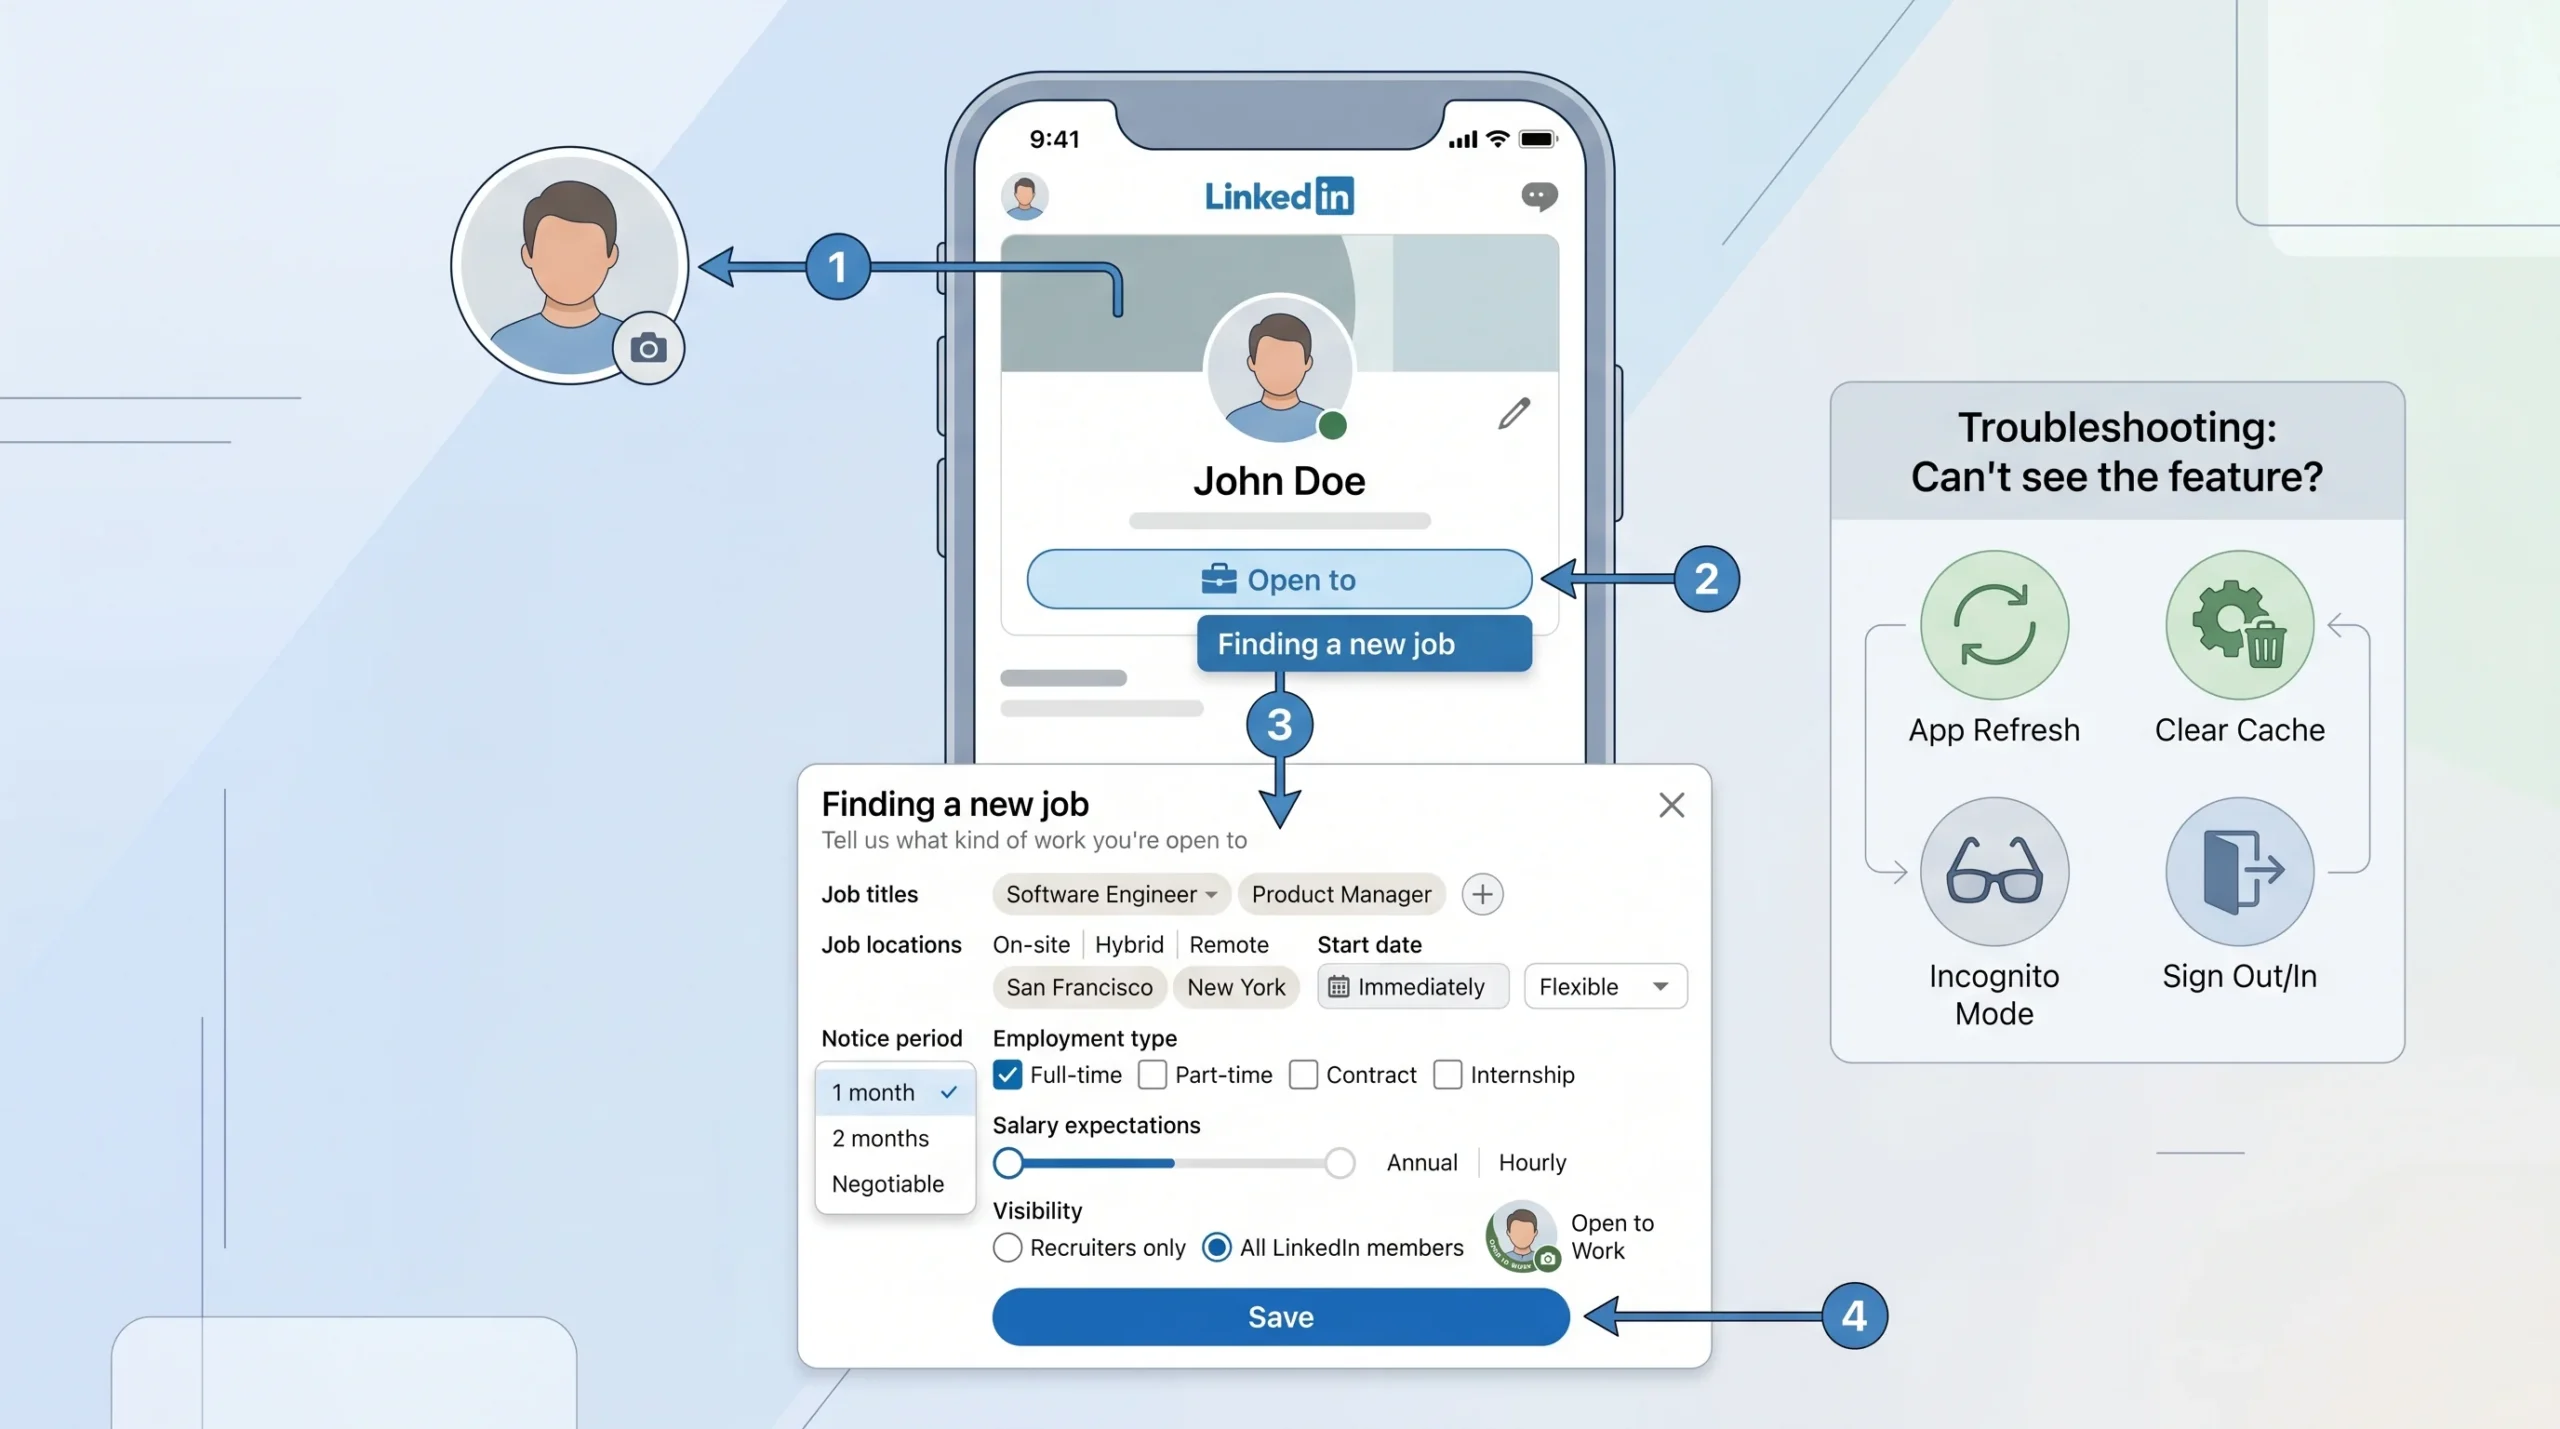
- Tap your profile photo to go to your profile.
- Look for the “Open to” button below your headline. Tap it and select “Finding a new job.”
- Fill in the same fields as described above: job titles, locations, start date, employment type, notice period, and optional salary.
- Select your visibility setting and tap “Save.”
- If the “Open to” button is not visible on your mobile profile, try accessing Open to Work through the Jobs tab at the bottom of the app. If the feature is still not loading correctly, LinkedIn recommends signing out and back in, trying incognito mode, or clearing the app cache.
What the “Start Date” field means vs. what the “Notice Period” field means:
These are two separate fields that communicate two different pieces of information. The “Start Date” field tells recruiters when you want to begin a new role. The “Notice Period” field tells recruiters how long you are contractually committed to your current employer before you can leave. A recruiter who sees “Start date: 3 months from now” and “Notice period: 3 months” understands your situation immediately. Filling in only one of these fields leaves the other as a question the recruiter will have to ask, which adds friction to early conversations.
The Two Visibility Options and Which One to Choose
When you set up Open to Work, LinkedIn gives you two visibility choices. This is one of the most important decisions you will make in the setup process, and the right answer depends entirely on your current employment situation.
Option 1: Recruiters Only
This mode shares your Open to Work status exclusively with recruiters who use LinkedIn Recruiter, which is LinkedIn’s paid recruiting platform used by hiring teams and agencies. When you choose this option, no green “#OpenToWork” banner appears on your profile photo. Your connections, colleagues, and current employer cannot see that you have enabled the feature (unless someone at your current company happens to use LinkedIn Recruiter and finds your profile in a search, which LinkedIn attempts to prevent by filtering out recruiters affiliated with your current employer).
This is the right setting if you are currently employed and your departure is not yet public. It gives you recruiter visibility without a network-wide announcement.
Option 2: All LinkedIn Members
This option adds the green “#OpenToWork” frame to your profile photo and makes your job search status visible to everyone on LinkedIn, including your full professional network, your connections’ connections, and anyone who views your profile. According to LinkedIn’s own figures, members who add the public green banner are on average 40% more likely to receive InMails from recruiters compared to those who do not display it.
This is appropriate if you have already left your job, your departure is publicly known, or you work in an industry where job transitions are frequent and visible job searches are socially accepted. If you are still employed and your manager does not know you are looking, avoid this option.
The practical recommendation: If you are serving notice and your departure has not been announced company-wide, start with “Recruiters Only.” Once your last day is confirmed and your manager is aware, you can switch to “All Members” for broader visibility. LinkedIn does not notify anyone when you change this setting, so the switch is seamless.
What Recruiters Actually See on Their End
This is the piece of information most job seekers never find out, and it is the reason filling in these fields accurately matters more than most people realize.
Inside LinkedIn Recruiter (the paid platform recruiters use to search for candidates), your profile card displays your notice period as a badge when you have set it. Recruiters can apply filters to their candidate searches by notice period length. A recruiter who needs someone available within four weeks can filter their entire search to show only candidates with a notice period of one month or less. If your notice period is set to three months, your profile does not appear in that search, regardless of how strong your experience and skills are.
This is why setting the notice period field accurately from day one is not just about transparency. It is about appearing in the right searches at the right time. A recruiter with a 30-day hiring window is not going to wait 90 days for a candidate when their filtered search can surface candidates who are available sooner. Appearing in the wrong searches wastes everyone’s time. Not appearing at all means you miss opportunities entirely.
The expected salary field works the same way. It is visible to recruiters on your profile card, allows them to filter for candidates whose expectations align with their budget, and prevents the awkward “what are your salary expectations” conversation from happening multiple calls into a process. According to the October 2025 LinkedIn update announcement, both the notice period and salary fields are shown to recruiters only, even when the Open to Work badge is set to public for all LinkedIn members.
How to Update Your Employment Status After Your Notice Period Ends
Once your last day has passed and you have officially left your employer, three parts of your LinkedIn profile need to be updated. Doing all three correctly and in the right order keeps your profile accurate, maximizes your recruiter visibility, and avoids the awkwardness of outdated information sitting on your public profile.
The three updates to make after your notice period ends:
- Update the end date on your most recent Experience entry. Go to your profile, click the pencil (edit) icon on the current role, set the end date to your actual last day of employment, and toggle off the “I am currently working in this role” checkbox. Click Save. LinkedIn will move the role from your “Current” section to your “Past” section. Your headline may update automatically if it was pulling from your job title — review it immediately after making this change to ensure it still reflects what you want recruiters to see.
- Update your Open to Work settings. Go to the Open to Work panel and update the start date to “Immediately” since you are now available without a notice period constraint. If you previously had “Recruiters Only” selected, consider switching to “All LinkedIn Members” for broader visibility now that you are no longer employed and your departure is public. Update the notice period field to “Immediately” as well.
- Turn off Open to Work once you have accepted an offer. This is an easy step to forget, but it matters. Leaving Open to Work active after you have accepted and started a new role generates recruiter outreach you have no interest in, and in smaller or more specialized industries, it can create reputational friction. LinkedIn does not notify your connections when you turn it off, so there is no downside to doing it quickly.
The Timing Question: When to Update LinkedIn After Accepting a New Offer
Accepting a new job offer is a clear milestone, but it is not the right moment to update LinkedIn with your new employer’s name and title. There are two main reasons for this.
First, offers can fall through. Start dates can change. In rare cases, candidates decide a role is not the right fit before they have even started. If you update LinkedIn the day you sign the offer letter and something changes before your first day, you now have incorrect information on your public professional profile that your entire network has already seen.
Second, most companies have a probation period that runs anywhere from three to six months. During that window, both sides are still evaluating the fit. Updating LinkedIn publicly signals confidence in the role before that confidence is earned. Some hiring managers notice when a new hire updates their LinkedIn before officially starting or very early in their tenure, and the optics vary by company culture.
The recommendation that aligns with professional norms: update your LinkedIn profile with the new role within two to four weeks of your actual start date, not before your first day and not six months into the role. Before making the update, turn off the “Notify your network” toggle in your LinkedIn privacy settings if you want to add the new role quietly without triggering a notification to your connections.
The Headline Strategy While Serving Notice (What Works and What Costs You Recruiter Visibility)
The LinkedIn headline is the single highest-weight field in LinkedIn’s search algorithm. Recruiters do not search for “serving notice” or “actively looking.” They search for job titles, skills, and domain keywords. Every character you spend in your headline on availability language is a character you are not spending on something a recruiter would actually type into a search bar.
This matters because LinkedIn gives you a 220-character limit for your headline. That sounds like a lot until you realize that a phrase like “Serving Notice Period | Available March 2026” consumes nearly 50 of those characters. Those are 50 characters that could have held a target job title, a key skill, a domain area, or a seniority signal that recruiter searches actually look for.
What headline language works and what does not:
- Does not work: “Senior Product Manager | Serving Notice Period | Available March 2026” — The notice period information is fine, but it displaces a keyword slot that should hold something searchable.
- Works better: “Senior Product Manager | B2B SaaS | Pricing | Growth | Open to roles | Notice: 60 days” — The first four terms are searchable. The availability note comes at the end and takes up minimal space.
- Works best (if character count forces a choice): “Senior Product Manager | B2B SaaS | Pricing Strategy | Product-Led Growth | Enterprise” — No availability language at all. The Open to Work panel already communicates availability to recruiters. The headline is reserved entirely for terms that drive search visibility.
The right formula: lead with your target role title, add two to four high-value keywords or domain terms, and only include notice period language if you have the character count left after doing that. The notice period field in Open to Work already communicates your timeline to every recruiter who finds your profile. Your headline does not need to duplicate that information at the cost of keyword space.
How to Write the About Section for Active Job Seekers
While your headline should be preserved for keywords, your About section (the text block directly beneath your headline and photo) is the right place to communicate your timeline explicitly to any recruiter who opens your profile.
The About section has a character limit of 2,600 characters and is not indexed by LinkedIn’s search algorithm in the same high-weight way as your headline and job titles. That makes it the appropriate place for context, narrative, and availability information.
The right opening structure for an About section during a job search:
Your first sentence should establish what you do and what you are looking for. Your second sentence should state your timeline. Everything after that should describe your experience, skills, and what makes you the right candidate for the roles you are targeting.
A concrete example of an effective opening: “After five years leading enterprise sales at [Company], I am now looking for my next head-of-sales role in Series B to D SaaS companies. Currently serving a 60-day notice period, available from [Month Year].”
This gives a recruiter your experience, your intent, your target role type, and your availability timeline in two sentences. They do not need to ask. They do not need to guess. They know within the first ten seconds of reading your profile whether it is worth their time to reach out.
What to avoid in the About section during a search:
- Do not open with “I am currently seeking new opportunities.” This is the About section equivalent of putting “actively looking” in your headline. Lead with what you bring, then state what you are looking for.
- Do not omit the availability timeline entirely. If a recruiter has to InMail you just to find out when you are available, some of them will not bother.
- Do not use the About section as a resume dump. Recruiters read your Experience entries for the details. The About section should tell a story, not list every task you have ever completed.
India-Specific Context: Managing the 60 to 90 Day Notice Period Problem
In India, notice periods of 60 to 90 days are standard contractual terms across mid-to-large IT companies, financial institutions, and corporate employers. This is not a negotiable norm in most cases. It is written into employment contracts, and breaching it carries financial penalties in many organizations.
The problem this creates in a job search is structural. A recruiter in India searching for a candidate to fill a role with a one-month timeline will set a filter for “notice period: 30 days or less” inside LinkedIn Recruiter. A professional with a 90-day contractual notice period does not appear in that search at all, regardless of how well-matched their skills are. This has been a persistent source of friction in the Indian hiring market for years.
LinkedIn’s October 2025 update to the Open to Work feature was partly driven by demand from this market. By adding a dedicated notice period field that is visible to recruiters early in their search process, LinkedIn gave Indian professionals a way to communicate their timeline upfront rather than revealing it mid-conversation after a recruiter’s interest has already been built. According to the update announcement, the feature was specifically designed to help recruiters in markets where long notice periods are common to align candidate availability with business timelines more efficiently.
Practical guidance for professionals in India navigating a long notice period:
- Set the notice period field accurately. Rounding it down to seem more available is a short-term tactic with a long-term cost. If a recruiter finds out your actual notice period is 90 days after they were told it was 30, the relationship starts on a false note.
- If you have a realistic buyout option, say so. Many Indian employment contracts include a notice period buyout clause that allows an employee to leave earlier by paying a financial penalty, typically equal to the salary for the remaining notice period. If your contract includes this and you are willing to use it, state it plainly in your About section: “90-day notice period per contract. Open to early release on a strong offer, including buyout discussion with current employer.”
- Use the notice period as productive profile-building time. A 60 to 90 day notice period gives you two to three months to optimize your LinkedIn profile before you are available. According to LinkedIn’s own platform data, profiles with at least five skills listed are 5.6 times more likely to be viewed by recruiters. This is the window to add skills, request recommendations from colleagues, update your experience descriptions with specific achievements, and build the profile that will convert recruiter views into actual conversations once you are available.
- Target recruiters who specialize in long-pipeline roles. Senior roles, niche technical positions, and executive-level hiring typically have timelines of 60 to 90 days from first contact to start date. Positioning yourself for these searches, where a long notice period is expected rather than a disqualifier, improves your chances of productive recruiter conversations while serving notice.
Conclusion
Updating your notice period and employment status on LinkedIn is not a single action. It is a series of decisions made across at least three different parts of your profile, and the sequence and timing of those decisions determines how accurately you appear in recruiter searches and how professionally you manage the transition.
The correct order: enable Open to Work with your accurate notice period and start date set to “Recruiters Only” while you are still employed. Write your availability into the opening of your About section, not into your headline. Update the Experience section only on or after your actual last day. Switch to “All Members” visibility once your departure is public. Turn off Open to Work the moment your offer is confirmed and you are certain the role is moving forward.
The one thing within your control throughout a job search is how clearly you communicate your timeline. Recruiters make decisions about who to contact based on the information in front of them. Give them accurate information, in the right fields, at the right time, and the conversations you get will be worth having.
FAQs
Q1: Does LinkedIn have a specific field for notice period?
Yes. LinkedIn added a dedicated notice period field inside the Open to Work feature in October 2025. When you enable Open to Work and select “Finding a new job,” you will see a field to enter your notice period, alongside options for job titles, locations, start date, and expected salary. This information is visible to recruiters only, regardless of whether your Open to Work badge is set to public for all LinkedIn members or restricted to recruiters only.
Q2: Can my current employer see that I updated my notice period or turned on Open to Work?
If you choose “Recruiters Only” mode, LinkedIn attempts to hide your Open to Work status from recruiters affiliated with your current employer. This is not a guaranteed block, but it is the platform’s best effort to protect your privacy while you are still employed. The notice period and expected salary fields inside Open to Work are recruiter-facing only and are not shown on your public profile. Your employer cannot see these fields through your profile page. The risk of exposure comes from recruiters at your company’s affiliated recruiting firms, which is the scenario “Recruiters Only” mode is designed to reduce.
Q3: Should I update my LinkedIn experience section to show my job has ended while I am still serving notice?
No. You are still employed until your official last day. Keep your current role listed as active with no end date. Closing the role before your final working day changes how LinkedIn’s algorithm categorizes your profile, which can remove you from recruiter searches for currently-employed passive candidates. It also triggers a network notification (unless you disable it in settings) and creates a visible timeline gap if the dates do not align cleanly with your next role.
Q4: What should I put in my LinkedIn headline while serving notice?
Prioritize searchable terms over availability language. Use your target job title and two to three relevant skills or domain areas in the first part of your 220-character headline. If character space remains after those terms, a short note like “Open to roles | Notice: 60 days” is acceptable. Putting “Serving Notice Period” alone without accompanying searchable keywords is a poor use of headline space because recruiters do not search for that phrase. The Open to Work panel already communicates your notice period to recruiters independently.
Q5: How do I update my LinkedIn profile after my notice period ends and I am officially unemployed?
Go to your most recent Experience entry, click the edit icon, set the end date to your actual last day of employment, and uncheck the “I currently work here” box. Then go to Open to Work settings and update your start date to “Immediately” and change your notice period to “Immediately” as well. Consider switching visibility from “Recruiters Only” to “All LinkedIn Members” to maximize exposure now that you are no longer employed and have nothing to conceal. Review your headline to ensure it still reflects what you want recruiters to see after the Experience update.
Q6: Is the notice period field on LinkedIn available in all countries?
The notice period field was initially rolled out in India and a few other markets before the October 2025 update expanded it more broadly. If the field is not visible in your Open to Work settings, try accessing the feature via the desktop version of LinkedIn rather than the mobile app, as mobile app updates can lag behind desktop rollouts. If the field is still not present in your region, you can communicate your notice period in the opening lines of your About section as an alternative.
Q7: Will turning on Open to Work double my chances of getting a recruiter message?
LinkedIn’s own data indicates that enabling Open to Work roughly doubles the likelihood of receiving an InMail from a recruiter. Adding the public green banner increases that further, to around 40% above the baseline for members who use Open to Work without the public frame. However, the feature works as a signal and a filter mechanism, not a guarantee of inbound outreach. Without a complete profile, relevant skills listed, and a keyword-optimized headline, the additional traffic generated by Open to Work will not convert into meaningful conversations at a meaningful rate.
Q8: What is the difference between “Recruiters Only” and “All LinkedIn Members” visibility in Open to Work?
“Recruiters Only” shares your Open to Work status exclusively with users of LinkedIn Recruiter, the paid recruiting platform. No green banner appears on your profile photo, and your connections cannot see the status. This is the right choice for anyone who is still employed and wants to search without a public announcement. “All Members” adds the green “#OpenToWork” frame to your profile photo and makes your status visible to everyone on LinkedIn. This is appropriate for professionals who are unemployed, whose departure is already public, or who are in industries where visible job searching carries no professional risk.
Q9: How long should I leave Open to Work enabled?
Turn it off as soon as you have accepted an offer and are confident the role is proceeding as planned. There is no benefit to leaving it on after you have found your next position, and there are real downsides: continued recruiter outreach you will have to decline, and in smaller or specialized industries, a visible signal that you are still available even after accepting somewhere else. LinkedIn does not notify your connections when you disable Open to Work, so there is no social cost to turning it off the day your offer is confirmed.