

Your LinkedIn profile is often the first impression potential clients, employers, and partners will have of you. But here’s the reality: a well-written headline and impressive job titles only get you so far. In today’s hyper-competitive professional landscape, what truly differentiates you is proof that you deliver results.
This is where your LinkedIn featured section becomes your most powerful asset. While most professionals overlook this feature entirely, savvy business leaders, consultants, and salespeople use it as a strategic tool to showcase client wins, testimonials, case studies, and media mentions—essentially turning their profile into a credibility machine.
The featured section isn’t just another profile element. It’s real estate on your profile where you can highlight evidence of your expertise, success, and value. When used strategically, it dramatically increases the likelihood that profile visitors take action—whether that’s reaching out for a partnership, hiring you for a project, or becoming a customer.
In this comprehensive guide, we’ll walk you through everything you need to know about leveraging your LinkedIn featured section to build social proof and generate qualified leads.
What is LinkedIn Featured Section
Before diving into tactics, let’s establish what the featured section actually is and why it matters so much in 2026.
What the Featured Section Actually Is
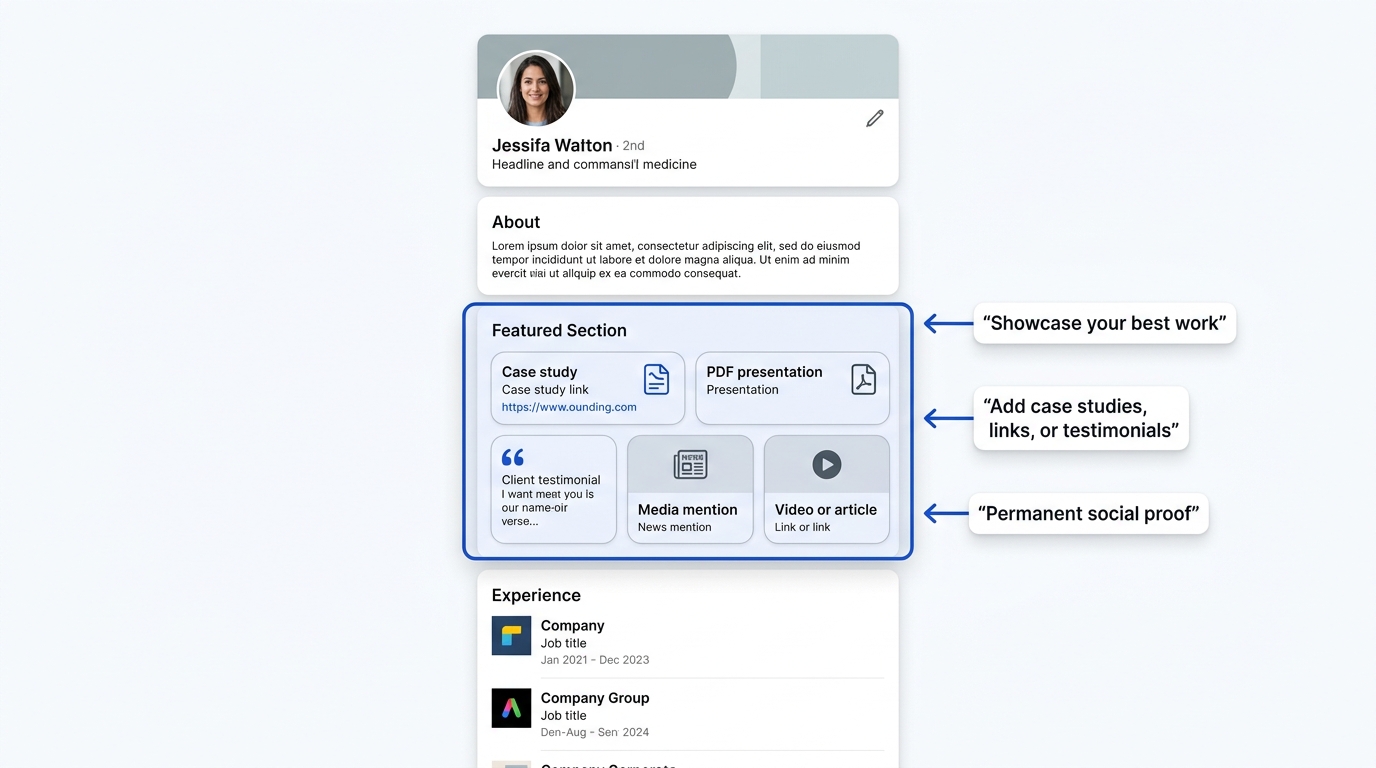
The featured section is a dedicated area on your LinkedIn profile located between your headline and the “About” section—where you can display content that showcases your best work, achievements, and accomplishments. Think of it as a curated gallery of your professional highlights.
Unlike your standard posts or articles, which get buried in the feed and disappear as time passes, your featured section is permanent. It sits on your profile where every single person who visits it will see it. It’s prime real estate, and most professionals waste it or leave it empty.
You can feature various content types in this section, including:
- LinkedIn posts and articles you’ve written
- External links to case studies, articles, or portfolio pieces
- PDF documents or presentations
- Images and videos
- Media mentions and press coverage
- Client testimonials and reviews
The key difference between the featured section and other profile elements is permanence and prominence. Your experience section shows your job history. Your about section tells your story. But your featured section shows proof that your story is real.
Why Social Proof Matters More Than Ever
Before we talk about how to use the featured section, we need to establish why social proof is so critical to your success on LinkedIn in 2026.
Social proof is the psychological phenomenon where people believe something is true or worthwhile because other people believe it’s true or worthwhile. In professional contexts, social proof comes in many forms: client testimonials, case studies showing real results, media mentions from credible publications, awards and recognitions, or simply displaying logos of recognizable companies you’ve worked with.
Here’s why this matters: According to research, 92% of professionals trust recommendations from other people more than they trust marketing messages. This means that when a prospect visits your profile, they don’t primarily care about what you say about yourself. They care about what others say about you.
Think about your own behavior. When you’re considering hiring a consultant or partnering with a company, do you believe their claims that they’re “excellent at what they do”? Probably not. But if you see three detailed case studies showing quantifiable results, testimonials from recognizable companies, and media coverage from respected publications, your skepticism diminishes dramatically.
This is the power of social proof. It transforms your profile from self-promotion into credible evidence of value delivery.
The Difference Between Featured Section and Other Profile Elements
Understanding what makes the featured section distinct is crucial to using it effectively.
Your About section is narrative. It tells your professional story, your values, and your approach. It’s important, but it’s self-written and self-serving.
Your Experience section lists your job history. It shows what you’ve done, but doesn’t demonstrate results or impact.
Your Recommendations and Endorsements provide third-party validation, but they’re scattered and fragmented. A visitor has to dig to find them.
Your LinkedIn posts and articles exist in the feed. They get engagement, but they fade over time as new content pushes them down.
Your featured section, on the other hand, is:
- Permanent: It doesn’t move or get buried. Every profile visitor sees it.
- Curated: You choose exactly what appears, creating a strategic narrative.
- Diverse: You can mix content types to tell a more complete story.
- Prominent: It’s one of the first things visitors see after your headline and job title.
- Action-oriented: It drives clicks to your case studies, portfolio, or lead magnets.
This makes the featured section fundamentally different from every other profile element. It’s not just supplementary information—it’s your primary vehicle for demonstrating social proof and building credibility.
Why Social Proof Is Your Most Powerful Lead Generation Tool on LinkedIn
Let’s dive deeper into why social proof is actually the most effective lead generation mechanism on LinkedIn, often outperforming paid ads, connection requests, and even cold messages.
How Prospects Evaluate Credibility Before Reaching OutF
Consider the typical buyer journey. A prospect encounters your profile—either through a search, a recommendation from a colleague, or because you reached out to them. They have roughly 30 seconds to decide whether you’re worth their time.
In those 30 seconds, they’re not asking “Does this person seem nice?” They’re asking much harder questions:
- Can this person actually deliver what they claim?
- Have they done work like mine before?
- What’s the evidence they know what they’re talking about?
- Can I trust them, or is this just marketing language?
Without social proof, you’re asking them to take a leap of faith based on your word alone. With social proof, you’re showing them evidence.
Think about it from a neuroscience perspective. When someone claims something about themselves, their brain is naturally skeptical. But when multiple independent sources (clients, media outlets, award committees) validate the same claim, their brain accepts it as truth. Social proof literally changes how the brain processes information.
This is why a prospect who sees your profile with three detailed case studies and five client testimonials is infinitely more likely to reach out than a prospect who sees the same profile without social proof. You’ve essentially removed the psychological barrier that prevents action.
Matching Social Proof to Prospect Pain Points
Not all social proof is equally valuable. The most effective social proof directly addresses the specific concerns of your target prospect.
Let’s say you’re a sales consultant. A prospect visiting your profile might be thinking: “I want to improve our sales process, but past consultants have always promised more than they delivered and disrupted our team. How do I know this person will be different?”
Generic social proof (“I’ve helped 50+ companies”) doesn’t address this concern. But specific social proof (“We helped [Company Name] implement a new sales process that increased close rates by 35% in 90 days, with zero team disruption because we focused on training over overhaul”) addresses exactly what they’re worried about.
This is why you need to think strategically about which social proof to feature. The featured section isn’t a dumping ground for everything positive about you. It’s a carefully curated selection of proof points that speak directly to your ideal client’s deepest concerns.
Types of Social Proof You Can Feature to Build Trust

Now let’s explore the different types of social proof you can showcase in your LinkedIn featured section, and understand which formats build the most credibility.
Client Testimonials and Success Stories
Testimonials are perhaps the most direct form of social proof. They’re statements from people who’ve actually worked with you, describing the results they experienced.
The most effective testimonials have several characteristics. First, they’re specific rather than generic. “Great to work with” is forgettable. “Helped us identify three new market segments we’d been overlooking, which added $2M in annual revenue” is compelling.
Second, they include context about who provided the testimonial. A vague quote from “a satisfied client” is far less credible than a quote from “Jane Smith, VP of Sales at [Recognizable Company].” The more prestigious the source, the more weight the testimonial carries.
Third, they address a specific problem or concern. The best testimonials follow this pattern: “We were struggling with [specific problem]. [Your name] helped us [specific solution]. The result was [specific outcome].”
You can feature testimonials in several formats within your LinkedIn featured section:
Text-based testimonials are straightforward. You create an image or document with the quote, the person’s name, title, and company. This works well and is easy to create.
Video testimonials are significantly more powerful. Seeing a real person on video, speaking genuinely about their experience with you, creates a level of authenticity that text cannot match. Video testimonials also demonstrate confidence—you’re comfortable showing unedited, real-world validation.
Testimonial compilations combine multiple quotes around a theme. For example, you might create an image with three quotes from different clients all saying variations of “He helped us improve sales productivity.”
The key when featuring testimonials is getting specific permission from clients and, ideally, getting their full name and title. Anonymous testimonials are less credible. “A CEO from the tech industry” doesn’t carry as much weight as “Sarah Johnson, CEO of TechVentures Inc.”
Case Studies and Project Results
If testimonials are the appetizer, case studies are the main course. A case study is a detailed narrative describing a client challenge, your approach to solving it, and the quantifiable results achieved.
The structure of an effective case study typically follows this pattern:
The Situation: What was the client’s challenge or goal? What was the business environment or constraint they were operating within? This section should paint a clear picture of the problem’s magnitude.
The Solution: What approach did you take? What specific actions or strategies did you implement? This is where you demonstrate your methodology and thinking.
The Results: What changed? By how much? In what timeframe? The most powerful results are quantifiable—revenue increase, time savings, efficiency gains, customer retention improvement.
When featuring case studies in your LinkedIn featured section, you have a few options:
You can create a visually attractive one-pager that summarizes the case study in a condensed format. This is ideal because it gives people enough information to understand the value without overwhelming them.
You can link to a full case study on your website, with the featured section displaying a compelling thumbnail and headline that drives clicks.
You can create a PDF document and upload it directly to the featured section, allowing visitors to download and read the full case study.
The most important element is quantifiable results. “Helped them improve efficiency” is vague. “Reduced monthly reporting time from 40 hours to 8 hours, saving $15,000 annually” is specific and compelling.
Media Mentions and Press Coverage
When you receive coverage in a reputable publication—whether that’s a major business magazine, industry-specific publication, or well-known media outlet—you’ve received third-party validation. A journalist or editor deemed your expertise or achievement newsworthy enough to publish.
This is powerful social proof because it’s completely outside your control. You can’t manufacture it through your own efforts. You can only earn it through genuine achievement or expertise.
When featuring media mentions in your LinkedIn featured section, you’re essentially borrowing credibility from the publication. A mention in Forbes carries more weight than a mention in a local blog. A quote in the Wall Street Journal carries more weight than a mention in a smaller industry publication.
To feature media mentions effectively:
Create a visually striking thumbnail that includes the publication logo, headline, and a compelling image. This makes the featured item stand out visually and immediately communicates “I’ve been featured in reputable media.”
Link directly to the article so interested visitors can read the full coverage and verify your credentials.
If you have multiple media mentions, consider creating a “As Featured In” graphic that displays logos of several publications. This multiplies the credibility effect.
Consider also creating summary graphics that highlight your key quotes or statistics from the media coverage. “As featured in [Publication], [Key Quote/Stat]” works well.
Awards, Certifications, and Recognitions
Professional awards and certifications serve a specific type of social proof: independent validation from recognized authorities.
When you earn a certification—whether that’s from LinkedIn (like becoming a LinkedIn Expert or getting certified as a sales trainer), from industry bodies, or from educational institutions—you’re demonstrating that your knowledge has been independently verified.
Similarly, industry awards show that peers and industry experts recognize your excellence. An award from a professional association, a “Top 50 [Profession]” ranking, or recognition as “Best [Service] in [Region]” all communicate that you’re recognized as excellent by credible sources.
When featuring awards and certifications in your LinkedIn featured section:
Create visually attractive graphics that showcase the award or certification. If it’s a well-known credential (like PMP, Salesforce Certified Administrator, etc.), the visual recognition alone builds credibility.
Include the year the certification was earned or award was given. Recent certifications carry more weight than certifications from a decade ago.
Group similar certifications together so they’re visually coherent. Multiple scattered items can look cluttered, but five relevant certifications grouped together communicate comprehensive expertise.
Client Logos and Portfolio Pieces
Sometimes the most powerful social proof is simply displaying the logos of recognizable companies you’ve worked with. If you’ve worked with Google, Microsoft, Amazon, or other household-name companies, featuring those logos immediately communicates that you operate at a high level.
This works because of what’s called “brand transfer.” When you associate yourself with a prestigious brand, some of that prestige transfers to you. It’s not rational, but it’s real.
When featuring client logos:
Make sure you have permission to display the logo. Some clients prefer confidentiality agreements that prevent you from publicly naming them as clients.
Consider creating a visual that groups logos together, such as a “We’ve Worked With” or “Trusted By” graphic that displays 8-12 client logos.
If you can’t name specific clients due to NDAs, consider creating anonymized case studies where you describe results without naming the client.
Order logos strategically. If you have both Fortune 500 companies and smaller companies, you might feature the most recognizable ones first.
How to Create Compelling Social Proof Content for Your Featured Section
You can’t feature social proof you don’t have. So let’s talk about how to gather, create, and curate the social proof that will make your LinkedIn featured section compelling.
Gathering and Requesting Testimonials
The biggest barrier most professionals face is that they don’t have testimonials to feature. So let’s address how to gather them systematically.
The key to getting testimonials is making it easy for clients to give them. Most people want to provide testimonials to clients they’re satisfied with, but they’re unsure what you want them to say and don’t have time to craft something from scratch.
Here’s an effective approach:
Reach out directly and specifically. Rather than vague requests like “Would you be willing to provide a testimonial?”, be specific: “Would you be willing to share, in 2-3 sentences, what specific result you got from working with us? I’m looking to highlight our success with clients in [specific area], and your experience would be really relevant.”
Provide a structure or prompt. Help them by suggesting a format: “We’d love a short testimonial addressing: What problem were you trying to solve? What results did you achieve? Would you recommend us to others in your industry?”
Offer options for format. Some people prefer writing; others prefer a quick video. Some prefer to be on the record with their name and title; others prefer anonymity. Give them options.
Ask for specific metrics if applicable. If they’ve achieved measurable results, ask them to include those: “We increased sales by 35%, reduced implementation time by 60%, improved customer retention by 25%.”
Make it easy to provide. If you’re requesting a video testimonial, provide clear instructions. If you’re requesting written, consider offering a short template they can fill in.
Time it right. Request testimonials when the client is happiest—right after completing a project, closing a deal, or achieving a significant milestone.
Follow up and thank profusely. When clients provide testimonials, thank them generously. Consider sending them something in return—a sincere thank you, a public mention of their achievement on LinkedIn, or something relevant to their business.
Once you have a few testimonials, the barrier to getting more drops significantly. You can share existing testimonials with new clients and say something like: “Here’s what others have said about working with us. Would you be willing to share your experience as well?”
Building Case Studies That Convert Prospects
Case studies are more work than testimonials, but they’re also more powerful. A detailed case study demonstrating specific results with a recognizable client is one of the most effective lead generation tools in existence.
Start by identifying clients who’ve achieved significant results working with you. Not every client is case study-worthy. You want clients who’ve achieved concrete, measurable results and are willing to have their story told (or a version of their story told).
Structure your case study with these key elements:
The Hook: Start with the result. “Increased sales productivity by 35% in 90 days” is more engaging than starting with the problem.
The Situation: Describe the client’s starting point. What was their challenge? What were they struggling with? What was the business impact of not solving this problem? Make the problem feel real and urgent.
The Solution: Describe your approach in enough detail that readers understand your methodology, but not so much that it becomes a technical manual. Focus on the key strategies and actions.
The Results: Quantify everything. Revenue increase, time savings, efficiency improvements, customer satisfaction scores—whatever metrics are relevant.
The Timeline: How long did it take to achieve these results? This helps other prospects understand what to expect.
The Testimonial: End with a quote from the client about their experience working with you.
When creating case studies for your LinkedIn featured section, you have formatting options:
One-page summary: Create a single attractive page that includes all key information. This works well because it’s comprehensive but not overwhelming.
Multi-page PDF: Create a more detailed document that people can download. This works if you’re capturing leads through a form in exchange for the case study.
Link to your website: Create a dedicated case study page on your website and link to it from your featured section.
Video case study: Feature a video interview with the client discussing their challenge, your solution, and the results achieved. Video is increasingly powerful.
The key is making results specific and credible. Avoid claiming credit for results you didn’t directly cause. Instead, present the facts: “After implementing our process, [metric] improved by [amount].”
Designing Visually Stunning Social Proof Assets
Here’s a critical reality: poor visual design makes even compelling content look unprofessional. And your LinkedIn featured section is visual. Items with attractive, professional visuals get more clicks and engagement than plain text or poorly designed graphics.
If you don’t have design skills, invest in hiring a designer for a few hours to create templates you can use repeatedly. A few professional designs for testimonials, case study covers, and media mentions will pay for themselves many times over in increased engagement.
Key design principles for featured section items:
Readability first: Ensure text is large enough to read on mobile devices. Test by viewing on a phone to verify.
Brand consistency: Use consistent colors, fonts, and styling across all featured items. This creates a cohesive, professional appearance.
Clear visual hierarchy: Make the most important information (usually the result or headline) the most visually prominent.
Professional imagery: Use high-quality images. Poor quality or low-resolution images damage your credibility.
Whitespace: Don’t cram too much information into one graphic. Whitespace makes designs easier to read and more professional.
Logo inclusion: If featuring client logos, use their official logos. If featuring media mentions, use publication logos.
Consider using design tools like Canva Pro (which has LinkedIn-sized templates), Adobe Express, or hiring a designer on Upwork or Fiverr to create custom designs.
How to Add Social Proof to Your Linkedin Featured Section
Now let’s walk through the exact process of adding items to your LinkedIn featured section.
Step 1 – Access Your Featured Section
On desktop, go to your LinkedIn profile and look for the “Edit public URL” option near your profile photo. Actually, that’s not it. Instead, look for the pencil icon or “Edit profile” button. Once in edit mode, scroll down until you find the “Featured” section.
If you don’t see a Featured section, you may need to add it. Look for an “Add section” button and select “Featured” from the options.
On mobile, tap your profile photo, then tap “Edit profile.” Scroll to find the Featured section. The process is slightly different on mobile, but the concept is the same.
Once you’re in the Featured section editor, you’ll see an interface that allows you to add new items or rearrange existing ones.
Step 2 – Choose the Right Content Type for Your Social Proof
LinkedIn allows you to add several types of content to your featured section:
LinkedIn posts: You can feature posts you’ve written. This works well if you’ve written high-engagement posts about your expertise or industry insights.
LinkedIn articles: If you’ve written articles on LinkedIn, you can feature these. Articles are longer-form content that demonstrates depth of knowledge.
External links: You can link to content on your website, blog, portfolio, or elsewhere on the internet. This is where most people link to case studies, portfolios, or media mentions.
Documents: You can upload PDFs, presentations, or images directly to LinkedIn.
Video: You can feature videos you’ve uploaded to LinkedIn or external video links.
Media (images): You can upload images to feature testimonials, quotes, or visual assets.
For social proof specifically, here’s what tends to work best:
- Client testimonials: Feature as images or documents
- Case studies: Link to external pages or upload as PDFs
- Media mentions: Link to articles with a custom thumbnail
- Awards/certifications: Feature as images or documents
- Client logos: Feature as a single image with multiple logos
- Video testimonials: Feature native LinkedIn videos or embedded videos
Step 3 – Add Your First Social Proof Item
To add a new item to your featured section, click the “Add” or “+” button within the Featured section editor.
You’ll then be prompted to choose the content type. Select the appropriate type for your social proof.
If you’re adding an external link, you’ll need to paste the URL. LinkedIn will typically pull a preview image and title from that URL.
If you’re uploading a document or image, you can click to browse your computer and select the file.
For native LinkedIn content (posts or articles), you’ll search for and select the content you want to feature.
Once you’ve selected the content, you’ll have the opportunity to add or edit the title and description.
Step 4 – Optimize the Title and Description
This is crucial. The title and description are what appear alongside your featured item. They’re your chance to contextualize the social proof and entice clicks.
Title best practices:
- Make it benefit-focused or result-focused
- Include specific metrics if applicable
- Keep it under 60 characters so it displays fully
- Make it compelling enough that someone wants to click
Instead of: “Case Study: Acme Corp” Try: “How We Helped Acme Grow Revenue 35% in 90 Days”
Description best practices:
- Use 2-3 sentences to provide context
- Explain why this social proof is relevant
- Include a subtle CTA if appropriate
- Keep it scannable with short sentences
Example: “Client was struggling with sales team productivity. After implementing our process, they increased close rates by 35% and added 20% more revenue per rep. Key insight: focus on activity coaching rather than outcome coaching.”
Step 5 – Organize for Maximum Impact
Once you’ve added items, you can rearrange them by dragging and dropping. The order of your featured section matters because not everyone will scroll through all items.
Here’s a strategic approach to ordering:
Primary position (first item): Put your most impressive social proof here. This might be a case study showing the biggest quantifiable result, or a testimonial from a recognizable, prestigious client.
Second and third positions: Feature different types of social proof. If your first is a case study, your second might be a client testimonial, and your third might be a media mention. Variety keeps things interesting.
Supporting items: Place additional case studies, testimonials, or certifications in supporting positions.
Recency optional: You don’t need to put newest items first. Instead, order by impact and relevance to your target audience.
How to Build a Featured Section That Converts
Having social proof is one thing. Strategically positioning it to convert prospects into leads is another.
How to Select Social Proof That Resonates With Your Target Audience
Not all social proof is equally valuable to your target audience. This is where strategy comes in.
Imagine you’re a B2B SaaS sales consultant. Your target market is VP of Sales at companies with $10-50M revenue who are struggling with sales team scaling.
If your featured section includes:
- A case study about improving sales team morale
- A testimonial from a VP of Sales at a $500M company
- An award for “Best Sales Coach” from a coaching association
- A media mention from a general business publication
The VP of Sales prospect is going to find the case study most relevant (it directly addresses their pain), the VP testimonial moderately relevant (it’s from their peer), the award somewhat relevant (it validates expertise), and the media mention least relevant (it’s not specific to their challenge).
When building your featured section, think about your target prospect’s specific concerns and fears. Then select social proof that directly addresses those concerns.
If your target audience is risk-averse (common in enterprise), feature social proof that emphasizes safety and proven track record.
If your target audience is innovation-focused, feature social proof that emphasizes cutting-edge results and forward-thinking approaches.
If your target audience is budget-conscious, feature social proof that emphasizes ROI and cost savings.
Match your social proof to your audience’s values and concerns.
How to Tell Your Professional Story Through Social Proof
Your featured section should tell a coherent narrative about your expertise, results, and approach.
Rather than random case studies and testimonials, think about the story you want your featured section to tell.
For example, if you’re a consultant who helps companies scale sales teams, your featured section might tell this story:
- First item: Case study showing specific revenue growth from sales team scaling
- Second item: Testimonial from a VP of Sales describing the transformation
- Third item: Media mention about your approach to sales scaling
- Fourth item: Second case study from a different industry showing similar results
- Fifth item: Certification or award validating your methodology
Together, these items tell a coherent story: “I help VP of Sales at mid-market companies scale their revenue through systematic team development. Here’s proof from multiple clients in different industries, validation from media coverage, and third-party certification of my approach.”
That’s much more compelling than a random assortment of testimonials and case studies.
How to Balance Different Types of Social Proof
Variety matters. If your featured section consists entirely of case studies, it might feel like you’re trying too hard to convince people. A mix of case studies, testimonials, media mentions, and certifications feels more balanced and credible.
A good ratio might be:
- 40-50% case studies or project results (the most compelling but time-intensive to create)
- 30-40% testimonials and client feedback (quick to gather, highly credible)
- 10-20% media mentions and external validation (powerful third-party proof)
- 5-10% certifications and awards (validates credentials)
This mix tells a complete story: clients have achieved significant results, they’re satisfied enough to provide testimonials, external media has validated your approach, and you have official credentials.
How to Create a Rotation Schedule for Fresh Social Proof
Your featured section shouldn’t be static forever. As you achieve new results and gather new social proof, you should rotate items to keep everything fresh and relevant.
A 90-day rotation schedule works well. Here’s how:
Every 90 days, audit your featured section:
- Which items are getting the most clicks and engagement?
- Are there new case studies or testimonials ready to be featured?
- Have new media mentions or awards come in?
- Do any items feel outdated or no longer relevant?
Remove underperformers: If an item is getting minimal engagement over 90 days, consider removing it and replacing it with something more compelling.
Add new wins: Fresh social proof signals that you’re still actively delivering results, not relying on old achievements.
Seasonal adjustments: If your business is seasonal or if certain social proof is more relevant during certain times of year, adjust accordingly.
Maintain consistency: While rotating items, maintain the narrative coherence discussed above. Don’t remove everything and start fresh.
How Featured Social Proof Drives Conversions
Understanding how prospects actually use your featured section to make decisions about reaching out is critical to optimizing it for lead generation.
How LinkedIn’s Algorithm Prioritizes Social Proof Content
LinkedIn’s algorithm isn’t transparent, but we know a few things about how it treats featured content:
Featured items get a visibility boost compared to older posts or articles. When someone visits your profile, the featured section is prominently displayed, which means it gets views regardless of engagement.
Items with high engagement (clicks, comments, shares) in your featured section trigger algorithmic signals that the content is valuable, which can increase your overall profile visibility.
Featured items that drive external traffic (links to your website) signal to LinkedIn that you’re creating valuable enough content that people want to explore further. This can impact your profile visibility in search results.
The practical implication: your featured section is one of the few places on your LinkedIn profile that gets guaranteed visibility. This makes it incredibly valuable real estate.
How Prospects Use Your Featured Section in Their Buying Decision
Understanding the buyer journey helps you optimize your featured section for conversion.
When a prospect first visits your profile, they’re in the awareness stage. They know they have a problem, and they’re trying to determine if you might be a potential solution. At this stage, they’re scanning your profile quickly, looking for evidence of relevance and credibility.
Your featured section should immediately communicate: “Yes, I work with people like you and get results similar to what you need.”
As they move into consideration, they spend more time on your profile. They read your about section, review your experience, and dig deeper into your featured section. At this stage, they’re asking: “Have you done this before? What were the results? Can I trust you?”
This is where case studies and detailed testimonials matter. They’re providing the detailed proof that reduces risk.
Finally, in the evaluation stage, a prospect might click through to your website, download a case study, or initiate a conversation. Your featured section’s CTAs should support this journey.
How to Drive Traffic From Your Featured Section to Your Website or Portfolio
If you only feature LinkedIn native content (posts and articles), your featured section serves primarily to build credibility on LinkedIn. But if you feature external links, you can use your featured section as a lead generation tool that drives traffic to your website.
When you link to an external resource (case study, whitepaper, calculator, etc.), you’re directing qualified prospects to your website where you can capture their email, gather information, or move them into your sales funnel.
Here’s how to do this effectively:
Create compelling destination pages: The landing pages you link to from your featured section should be high-quality. Poor landing pages waste the traffic you’ve generated.
Optimize for conversion: If you’re driving traffic to a lead magnet (whitepaper, checklist, template), make the signup process simple—ideally asking for just name and email.
Match the promise to the delivery: If your featured section headline promises a case study about “How to Increase Sales Productivity by 35%,” the landing page should deliver exactly that. Don’t bait-and-switch.
Use clear CTAs: The description under your featured item should make clear what happens when someone clicks. “Read the full case study,” “Download the template,” “See the results.”
Track the traffic: Use UTM parameters in your links so you can track which featured items drive the most traffic and which visitors take the most valuable actions.
How to Convert Profile Visitors Into Leads Through the Featured Section
Not everyone who visits your profile will click on a featured item. Some will just read your about section and move on. But for those who do engage with your featured section, you want to maximize the likelihood that they eventually reach out.
This is where strategic CTAs matter. Rather than relying on people to figure out what to do next, guide them explicitly.
At the end of your about section or in a follow-up message if they engage with your content, include a clear CTA: “Interested in similar results? Let’s chat about your situation. Click here to schedule a brief call” or “Want to learn how we achieved these results? Download our full case study here.”
Some professionals also use LinkedIn’s featured section to link to a lead magnet—a free resource (checklist, template, guide) that captures email addresses.
For example, a consultant might feature a link to a “Sales Team Scaling Checklist” which drives qualified prospects to a landing page where they submit their email in exchange for the checklist. These prospects then enter the email list and can be nurtured toward a conversation.
Industry-Specific Social Proof Strategies: Optimizing for Your Field
Different industries and career stages have different optimal social proof strategies. Let’s explore how to approach this by profession.
Sales and Business Development
If you’re in sales or business development, your featured section should demonstrate your ability to generate revenue and build relationships.
Featured items might include:
- Case studies showing deals closed, revenue generated, or sales cycles compressed
- Testimonials from decision-makers you’ve worked with
- Client logos showing you work with recognizable brands
- Media mentions about your sales track record or market insights
The metrics that matter in sales: deals closed, revenue generated, customer retention, account growth.
Consulting and Professional Services
Consultants benefit from demonstrating transformation and expertise.
Featured items might include:
- Detailed case studies showing client challenges and solutions
- Testimonials from C-suite executives
- Certifications and credentials (PMP, Six Sigma, etc.)
- Speaking engagements and conference appearances
- Media coverage of your methodology or approach
The metrics that matter: client ROI, implementation timelines, customer satisfaction scores, client retention.
Content Creators and Thought Leaders
If you build your business on thought leadership, your featured section should showcase your reach and credibility.
Featured items might include:
- Your best-performing articles or posts
- Media mentions and press coverage
- Speaking engagements
- Subscriber or audience numbers
- Notable clients or partnerships
The metrics that matter: audience size, engagement rates, media impressions, speaking opportunities.
Job Seekers and Career Changers
If you’re actively job hunting, your featured section should demonstrate your capabilities through portfolio work and achievements.
Featured items might include:
- Portfolio pieces showing your best work
- Project case studies with metrics
- Certifications and training
- Recommendations and testimonials
- Speaking engagements or volunteer work
The metrics that matter: impact on projects, learning and growth, results achieved, recognition received.
Entrepreneurs and Founders
Founders should feature their business traction and achievements.
Featured items might include:
- Customer testimonials and success stories
- Business metrics (revenue growth, customer count, retention)
- Media coverage and funding announcements
- Product demos or launches
- Speaking engagements
The metrics that matter: customer acquisition, revenue, retention rates, market validation.
How to Optimize Your Featured Section for Maximum Social Proof Impact
Let’s get tactical about the details that separate an okay featured section from a great one.
Visual Design Standards That Build Trust
Your featured items live in a visual medium. Poor design damages credibility. Great design builds it.
Professional design standards:
- Resolution: All images should be at least 1200 x 627 pixels (LinkedIn’s recommended size). Blurry or pixelated images look unprofessional.
- Consistency: Use consistent fonts, colors, and styling across all featured items. This creates visual cohesion.
- Readability: Ensure text is readable on mobile devices. Test by viewing on a phone. Text that’s readable on desktop might be too small on mobile.
- Branding: Incorporate your brand colors and fonts if you have a personal brand.
- Whitespace: Don’t cram too much information into one graphic. Whitespace makes designs easier to read and more premium-looking.
- Professionalism: Avoid cutesy fonts, excessive colors, or amateur-looking graphics. You’re trying to convey expertise.
If you’re not confident in design, invest in hiring someone. A few professional designs cost $50-200 and will be used hundreds of times.
Writing Compelling Social Proof Headlines
Your headline is the first thing people see. It needs to be compelling enough to make someone want to click.
Strong headline formulas:
- Result-focused: “How We Helped [Company] Increase Revenue 35% in 90 Days”
- Problem-solution: “From Manual Reporting to 30-Minute Automated Monthly Reports”
- Curiosity: “Three Unexpected Findings From Our Sales Methodology”
- Specificity: “VP of Sales at [Company] Shares How They Achieved 45% Faster Sales Cycles”
- Benefit-focused: “Why Top Sales Teams Choose This Approach”
Weak headlines to avoid:
- Generic: “Case Study” or “Our Work”
- Vague: “Impressive Results” or “Great Testimonial”
- Self-focused: “Why We’re Different” (prospects don’t care about you, they care about results)
The Psychology of Social Proof Ordering
The order of items in your featured section matters psychologically.
Primacy effect: People remember the first thing they see better than other items. Put your most impressive social proof first.
Variety principle: Monotony reduces engagement. If all your featured items are testimonials, they blur together. Mixing case studies, testimonials, media mentions, and certifications keeps things interesting.
Recency effect: People also remember recent items. While you don’t need to put newest items first, including some recent wins later in your featured section reminds people that you’re still actively delivering results.
Narrative flow: Order items in a way that tells a story. Start with your strongest result, add supporting evidence, and finish with a media mention or certification that validates your approach.
Avoiding Common Featured Section Mistakes
| Mistake | Why It Hurts | Solution |
|---|---|---|
| Outdated social proof | Signals you’re not currently delivering results | Refresh featured section quarterly |
| Generic or vague descriptions | Doesn’t help people understand the significance | Make descriptions specific and quantifiable |
| Poor visual quality | Looks unprofessional and damages credibility | Invest in professional design |
| Too many items | Overwhelms visitors and dilutes impact | Limit to 5-7 well-chosen items |
| No CTA or next step | Doesn’t drive action | Include clear CTAs that guide next steps |
| Irrelevant social proof | Doesn’t resonate with your target audience | Select social proof that addresses prospect concerns |
| All the same type | Becomes monotonous and feels less credible | Mix case studies, testimonials, media, and awards |
| Hard to read on mobile | Most people view LinkedIn on mobile | Test all items on mobile devices |
How to Track Featured Section Performance
You can’t improve what you don’t measure. Here’s how to track your featured section’s performance.
Metrics That Matter: What to Track
Profile views: Check how many people visit your profile. A significant increase after adding strong social proof suggests it’s working.
Featured section clicks: LinkedIn doesn’t directly tell you how many clicks each featured item gets, but you can infer it through traffic increases to linked pages.
Traffic from LinkedIn: Use UTM parameters on links to track how much traffic comes from your featured section to your website.
Lead quality: Track not just how many people click through, but how many become qualified leads or customers.
Engagement: Monitor comments, shares, and reactions on featured posts or articles.
Using LinkedIn Analytics for Your Featured Section
LinkedIn’s analytics dashboard provides insights into your profile performance. While it doesn’t break down featured section specifically, you can gather relevant data:
- Profile views: Shows total profile visits and trends over time
- Impressions: Shows how many people have seen your profile
- Search appearances: Shows how often your profile appears in searches
- Demographics: Shows who’s viewing your profile (role, company size, industry)
- Traffic: Shows which parts of your profile are getting clicks
Increasing profile views combined with strong social proof suggests your featured section is working.
A/B Testing Your Featured Section
You can test different approaches:
- Test 1: Feature different items and see which gets more clicks (by tracking traffic to those linked pages).
- Test 2: Change the order of items and see if certain positions get more engagement.
- Test 3: Test different descriptions with the same featured item.
- Test 4: Feature different quantities of items (e.g., 5 items vs. 7 items) and see what converts better.
Run each test for at least 2 weeks to gather enough data.
When to Rotate or Replace Featured Items
If an item is getting minimal engagement (no clicks, no traffic to linked pages) after 60-90 days, consider replacing it.
If you’ve achieved new results or received new testimonials, add them relatively soon so your featured section stays fresh.
Seasonal rotation makes sense if your business is seasonal. A consultant might feature different case studies in Q1 versus Q4 if they address different seasonal challenges.
Your Social Proof Action Plan: From Profile Gaps to Lead Generation Machine
If you’re ready to build a powerful featured section, here’s your action plan.
Week 1 – Assessment and Audit
Spend this week taking inventory of what social proof you already have:
- Write down all client testimonials you’ve received (even if they’re informal)
- List projects where you achieved significant, measurable results
- Document any media mentions, press coverage, or speaking engagements
- Note any awards, certifications, or recognitions
- List recognizable companies or clients you’ve worked with
Week 2 – Gathering and Creating Assets
Identify gaps and fill them:
- Reach out to 5-10 clients requesting testimonials (focus on those with best results)
- Create 2-3 case studies from your best client results
- Gather any media mentions or press coverage
- Take screenshots or gather evidence of awards and certifications
- Get permission from clients to use their logos or names
Week 3 – Implementation
Create your featured section:
- Design or commission design for testimonials, case studies, and other assets
- Write compelling headlines and descriptions for each item
- Add items to your featured section in optimal order
- Test on mobile to ensure everything looks professional
Week 4 and Beyond – Measurement and Improvement
Track performance and optimize:
- Monitor profile views and traffic from featured items
- After 90 days, assess what’s working and what isn’t
- Rotate underperforming items
- Add new social proof as you achieve new results
Conclusion
Your LinkedIn featured section is one of the most underutilized assets in professional networking and lead generation. While most professionals leave it empty or fill it haphazardly, strategic use of the featured section can dramatically increase your credibility, visibility, and ability to generate leads.
The formula is simple: identify your best work and results, gather evidence of success (testimonials, case studies, media mentions), present that evidence professionally in your featured section, and let prospects see proof of your expertise before they decide whether to reach out.
The difference between a profile with a weak or empty featured section and one with strong social proof is often the difference between being ignored and being approached with genuine interest.
Start this week. Take inventory of your social proof. Request testimonials from satisfied clients. Create one case study. Then add these items to your featured section in a strategic order with compelling descriptions.
Your future clients and partners will thank you. Because people don’t buy based on what you say about yourself—they buy based on what others say about you. Your featured section is where you let them speak.
Frequently Asked Questions
Q: Can you feature client testimonials directly, or do you need to create images?
A: You can feature testimonials in several formats. Text-based testimonials work fine if created as images or documents. Video testimonials are often more powerful. LinkedIn doesn’t have a specific “testimonial” content type, so you’re creating content (image, document, or video) that displays the testimonial.
Q: How many items should you include in your featured section?
A: Research suggests 5-7 items is optimal. Too few and you’re not showcasing enough social proof. Too many and you overwhelm visitors and dilute impact. Five well-chosen items outperforms ten mediocre items every time.
Q: How often should you update your featured section?
A: Quarterly reviews work well. Every 90 days, assess what’s working and what isn’t. Replace underperformers. Add new wins. You don’t need to change everything; even changing 1-2 items quarterly keeps things fresh.
Q: Does the featured section help with LinkedIn profile search visibility?
A: Indirectly, yes. A profile with strong social proof and engagement gets more views and interactions, which can improve visibility in search results. Additionally, if your featured items drive external traffic and engagement, this signals to LinkedIn that your profile is valuable, which can boost visibility.
Q: What if you don’t have many testimonials or case studies yet?
A: Start with what you have. Feature even one strong case study or testimonial. Request testimonials from recent clients. Feature certifications or media mentions if you have them. Your featured section doesn’t need to be perfect; it just needs to start building credibility. Most professionals are in the same boat—start where you are, then build from there.
Q: Can you feature video testimonials?
A: Yes. You can upload videos directly to LinkedIn and then feature them in your featured section, or you can link to videos hosted elsewhere. Video testimonials are incredibly powerful because they’re authentic and harder to fake. If you have the ability to record video testimonials, do it.
Q: Should you feature your own content or external social proof?
A: Mix both. Your own content (articles, posts) demonstrates thought leadership and expertise. External social proof (testimonials, case studies, media mentions) demonstrates credibility and trust. A mix of both is most effective.
Q: How do you get permission to feature client testimonials or case studies?
A: Always ask. In the testimonial request, explain how you want to use it: “I’d like to feature your testimonial in my LinkedIn profile to show potential clients the types of results we deliver. Is that okay with you?” Most clients are happy to be featured. Some may request anonymity or have confidentiality agreements—respect those agreements.